I have been asked to get on the ball and finish this conversion. My deepest apologies, I had sent the body off to be painted after I narrowed it and then the hard drive that the pictures were on crashed, so I haven't done anything with the conversion articles. Back to work on it then.
Now that the locomotive had been disassembled, it's time to narrow the body before it can be painted.
To
do this you need a MicroTrains Z scale gauge, a set of calipers, a
collection of #11 Xacto blades with handle and a Dremil tool with a sanding drum. I did my
first one using only the MT wheel gauge without benefit of
calipers, but the calipers do make this job a lot easier. I had to
narrow a couple of sets of drivers for my first one because I melted the
plastic on one set and destroyed the drivers, and on the second set I
didn't chamfer the axle ends and destroyed the drivers trying to put
them back on the axles.
To shrink the body down you squeeze the
drivers in on their shafts until they fit the Z scale MicroTrains wheel
gauge (or until they are .205" back to back). Be sure that the gear is
centered between the drivers and then mark the ends,
slide the drivers off and then cut the axle stubs off (you want to
remove 0.050" from each axle end). Chamfer the axle ends to install the
drivers back on and quarter the drivers (this is how I usually do it to
prevent damage to the drivers). The axles will be 0.375" long when you
are done.
It's easier to take the drives off and
chamfer the axle ends when you are done, but pushing the drivers in and
grinding/filing off the axle stubs does work. To do it this way I push
the wheels in to fit the MT gauge, making sure the gear is centered
between them, then mark the axles with a black magic marker. Push the
wheels all the way in to the gear and cut the marked ends off of the
axles. Work slowly and let the axle ends cool between cuts so you don't
melt the driver centers. Quarter the drivers when you are done.
Next
take a file and file the bottom plate, removing 0.050" from each side,
to reduce it's width to 0.185". The rule of thumb is to file until half
of the lettering is removed from each side. Now you can reinstall the
worm gear and bottom plate into the loco shell and use it as a guide to
narrow the locomotive wheel wells. Work slowly and carefully, you will
open the tops of the wheel wells into the cavity where the worm gear
resides but this is OK. A combination of #11 Xacto blades and the large
sanding drum for the dremil tool works very well for this, but use a
variable speed tool set to a low speed setting to prevent overheating
and distorting the plastic shell. Remove the bottom plate and worm gear,
install the narrowed drivers and make sure they turn freely. Remove
material as necessary until they do.
For the pilot truck, cut the
plastic bars that hold it to the cylinders at the ends of the slot the
truck rides in, the front bar at the right side and the rear bar at the
left side, to make two L shaped pieces. Pull one wheel from each axle to
remove the axles from the truck, reinstall the wheel and squeeze the
wheels to fit the MT gauge and cut off the stub ends. File each side of
the pilot truck 0.050" to fit the narrowed axles. Reinstall the axles
and wheels into the narrowed truck, making sure they turn freely.
Now
to narrow the cylinders (this is optional but it does make the loco
look better). Trim the bottom of each L back to the cylinders to narrow
them (I really need to take some pictures of this step) and then glue
the cylinders back together, installing the pilot truck as you do so.
Cut the same amount off of each valve gear hanger on the locomotive body
so the cylinders will fit back on. Paint the locomotive body and
reinstall the cylinders and pilot truck. Don't worry about the
mechanical strength of the cylinder connecting bars too much, the
physical strength of the cylinders glued on to the locomotive body
supply most of the needed support; the bars are there mostly just to
hold the pilot truck. You can drill some holes and put in brass rods to
replace the plastic if you like.
At this point the drivers, worm
gear and bottom plate can be reinstalled. To reinstall the drive rods
you will either have to trim the locomotive body between the drivers to
clear them or bend them outward to clear the locomotive body. The
locomotive body itself is now done.
In the next installment we will narrow the tender trucks and reassemble the tender. Then the tender can be reunited with the locomotive and the finished product can be tested.
Showing posts with label 4-4-0. Show all posts
Showing posts with label 4-4-0. Show all posts
Tuesday, April 23, 2019
Friday, September 5, 2014
Rock Quarrys and 4-4-0's
So I started a new project just as a fun sort of thing, it started out
as an experiment/test track but I'm also doing some new things with it.
It's all fun and games, right?
Anyway the theme for the new layout is a rock quarry set sometime around the 1880's. The inspiration was the winning on the auction site of an old timey Bachmann 4-4-0 freight set, you know the one. You also know that the B-mann is...to put it mildly, not the best running or pulling locomotive in the world. It can barely pull its 4+caboose freight train around the layout, and when I added a combine and coach to the mix it was completely lost.
As you may also know Atlas has recently (within the last few years) released its own version of the 4-4-0, so I ordered an undecorated unit. It got here today.

First impressions, man this thing is fra-JEEE-lay! As in, the pony truck fell off as soon as I took it out of the box and one of the boiler stays was already gone, fragile. The pony truck is pretty easily fixed, but it means you have to turn the loco upside down and pry up on the base plate, which means either you pull the whistle off the steam dome or risk breaking off that fragile plastic whistle. A brass unit may have been a better choice for this part.

At any rate, with the pony truck and whistle both installed the examination went on. I compared it side-by-side with the B-mann (note: the Bachmann 4-4-0 in the pictures is not the one from the train set; this one is a newer release and was used primarily because it has a knuckle coupler installed. The dimensions are the same) and dimensionally everything actually looks pretty even although the Atlas certainly shines in the (small and fragile) details. The undec/unpainted Atlas has a clear headlight which is kind of hard to see details on, but the reason for that is this loco has a working headlight (unlike the B-mann), or at least it does when the clear unit is painted.

 The tender
is closer coupled, and it's cast-on (fixed, non-swiveling) trucks have
bigger wheels and no copper springs showing, which also means the loco
is a bit shorter than the B-mann although the tender dimensions are
pretty close (I didn't break out the micrometer). The top of the tender looks a bit funny to me, too, since the fuel load
(coal, cast in) only takes up the center instead of spreading all the
way to both sides as the Bachmann does. From the pictures and plans I have seen the Atlas is technically correct, although the load (usually wood) was generally heaped high enough to overfill the fuel bunker and cover the tender top as on the Bachmann. An Atlas Accumate coupler is affixed to the rear.
The tender
is closer coupled, and it's cast-on (fixed, non-swiveling) trucks have
bigger wheels and no copper springs showing, which also means the loco
is a bit shorter than the B-mann although the tender dimensions are
pretty close (I didn't break out the micrometer). The top of the tender looks a bit funny to me, too, since the fuel load
(coal, cast in) only takes up the center instead of spreading all the
way to both sides as the Bachmann does. From the pictures and plans I have seen the Atlas is technically correct, although the load (usually wood) was generally heaped high enough to overfill the fuel bunker and cover the tender top as on the Bachmann. An Atlas Accumate coupler is affixed to the rear.

Drivers are approximately the same size and the pony truck is attached via an arm (remarkably similar to the Atlas Pacific) rather than directly to the cylinders like the B-mann. The Bachmann actually weighs a little more, coming out on my super precision kitchen scales at 1.4 oz while the Atlas only clocked in at 1.3 oz. Also unlike the B-mann unit there is no weight in the cab, which means you can see right through it. There is no bottom or lower back wall to the cab on the Atlas (meaning there is no flat surface where the driveshaft goes through), so it looks a bit unfinished since the cab walls are just hanging out in space. The undecorated Atlas also comes with a straight stack in the box that you can add on in place of the diamond stack that is already fitted to the model.


The only real visual quibble I have about the locomotive, aside from the unfinished looking cab (that you really don't notice unless you are closely examining it due to the tighter spacing on the tender) is the driver centers, the spokes are almost not there at all. NZT Products makes the fix, but from what I understand it's not for the faint of heart.

On the track, neither pulling a train, the Bachmann takes a higher starting voltage and runs faster at all throttle settings. The Bachmann is also slightly more forgiving of track work, the Atlas derailed twice on its first trip around while I have never had an issue with the Bachmann. Oddly enough it seemed to me that despite its higher voltage requirements the Bachmann started a bit smoother, although the Atlas was not rough at all by any means. Somewhat leery of its lighter weight, I attached a train to the Atlas
Holy smokes this thing really pulls. I don't know what it is but I suspect the weight distribution is better on the Atlas despite its overall lower weight, the Spookshow article shows the split frame construction which surely makes a difference. With only 2 flatcars (I pulled the body off the tank car), the gondola and a caboose the Bachmann slips and struggles all the way around the track, but the Atlas took off smoothly with the same train and pulled as if it didn't have a train attached at all.
So I started adding cars to the smug little Atlas, and before long it was happily steaming around the track with two boxcars, three flats, a gondola, a bobber caboose, and Athern/Roundhouse Overland coach and combine in tow, nary a slip or a struggle in sight.
The only thing the Bachmann has going for it now is price. So you can't get the Atlas for 15 bucks apiece at the train shows, so what, they have just made the brand new Bachmann 4-4-0's overpriced at any level. The Bachmanns in my collection that don't immediately go on permanent display will either be converted to Nn3 or sold off (I don't need very many Nn3 4-4-0's after all...in fact I have all I really need at one) and the Atlas has found a permanent place on the Rock City layout.
In my opinion, if you want to run 1880's era 4-4-0 locomotives the Atlas is the only way to go.
Anyway the theme for the new layout is a rock quarry set sometime around the 1880's. The inspiration was the winning on the auction site of an old timey Bachmann 4-4-0 freight set, you know the one. You also know that the B-mann is...to put it mildly, not the best running or pulling locomotive in the world. It can barely pull its 4+caboose freight train around the layout, and when I added a combine and coach to the mix it was completely lost.
As you may also know Atlas has recently (within the last few years) released its own version of the 4-4-0, so I ordered an undecorated unit. It got here today.
First impressions, man this thing is fra-JEEE-lay! As in, the pony truck fell off as soon as I took it out of the box and one of the boiler stays was already gone, fragile. The pony truck is pretty easily fixed, but it means you have to turn the loco upside down and pry up on the base plate, which means either you pull the whistle off the steam dome or risk breaking off that fragile plastic whistle. A brass unit may have been a better choice for this part.
At any rate, with the pony truck and whistle both installed the examination went on. I compared it side-by-side with the B-mann (note: the Bachmann 4-4-0 in the pictures is not the one from the train set; this one is a newer release and was used primarily because it has a knuckle coupler installed. The dimensions are the same) and dimensionally everything actually looks pretty even although the Atlas certainly shines in the (small and fragile) details. The undec/unpainted Atlas has a clear headlight which is kind of hard to see details on, but the reason for that is this loco has a working headlight (unlike the B-mann), or at least it does when the clear unit is painted.
Drivers are approximately the same size and the pony truck is attached via an arm (remarkably similar to the Atlas Pacific) rather than directly to the cylinders like the B-mann. The Bachmann actually weighs a little more, coming out on my super precision kitchen scales at 1.4 oz while the Atlas only clocked in at 1.3 oz. Also unlike the B-mann unit there is no weight in the cab, which means you can see right through it. There is no bottom or lower back wall to the cab on the Atlas (meaning there is no flat surface where the driveshaft goes through), so it looks a bit unfinished since the cab walls are just hanging out in space. The undecorated Atlas also comes with a straight stack in the box that you can add on in place of the diamond stack that is already fitted to the model.
The only real visual quibble I have about the locomotive, aside from the unfinished looking cab (that you really don't notice unless you are closely examining it due to the tighter spacing on the tender) is the driver centers, the spokes are almost not there at all. NZT Products makes the fix, but from what I understand it's not for the faint of heart.
On the track, neither pulling a train, the Bachmann takes a higher starting voltage and runs faster at all throttle settings. The Bachmann is also slightly more forgiving of track work, the Atlas derailed twice on its first trip around while I have never had an issue with the Bachmann. Oddly enough it seemed to me that despite its higher voltage requirements the Bachmann started a bit smoother, although the Atlas was not rough at all by any means. Somewhat leery of its lighter weight, I attached a train to the Atlas
Holy smokes this thing really pulls. I don't know what it is but I suspect the weight distribution is better on the Atlas despite its overall lower weight, the Spookshow article shows the split frame construction which surely makes a difference. With only 2 flatcars (I pulled the body off the tank car), the gondola and a caboose the Bachmann slips and struggles all the way around the track, but the Atlas took off smoothly with the same train and pulled as if it didn't have a train attached at all.
So I started adding cars to the smug little Atlas, and before long it was happily steaming around the track with two boxcars, three flats, a gondola, a bobber caboose, and Athern/Roundhouse Overland coach and combine in tow, nary a slip or a struggle in sight.
The only thing the Bachmann has going for it now is price. So you can't get the Atlas for 15 bucks apiece at the train shows, so what, they have just made the brand new Bachmann 4-4-0's overpriced at any level. The Bachmanns in my collection that don't immediately go on permanent display will either be converted to Nn3 or sold off (I don't need very many Nn3 4-4-0's after all...in fact I have all I really need at one) and the Atlas has found a permanent place on the Rock City layout.
In my opinion, if you want to run 1880's era 4-4-0 locomotives the Atlas is the only way to go.
Friday, June 27, 2014
Back It Up
The Bachmann 4-4-0 conversion I have never did want to back up. Any attempt to reverse this loco would cause the locomotive to roll over and fall off the tracks.
I finally figured out what the problem was. I have a non-Bachmann screw in the loco to tender connection because I lost the original and couldn't find a replacement. The problem was the original screw was shouldered and the replacement was not.
The tender connection is a large open loop that goes around the screw. With the standard shouldered screw the shoulder fills this hole pretty well, with the replacement, not so much. So, when the loco would back into the tender it would get close enough that the driveshaft would bind against the loco body and tip it over.
I filled the tender loop with a piece of scrap styrene, drilled a smaller hole for the screw, and just like magic the problem is solved and the loco will back happily around the layout with it's train preceding it, no problems at all.
I only wish my standard gauged Bachmann 4-4-0's ran this well.
Sunday, May 6, 2012
Prep Work
I finally have the bell and pilot ordered for the 4-4-0, and while I was on an ordering kick I ordered the end rails I need for these, one set each of these, and the wheelsets and couplers required for all of them.
I'm expecting them all to arrive sometime next week, just in time for me to go to Florida and help Pop-In-Law to clean out his garage and not get a chance to do anything with them.
Stay tuned!
I'm expecting them all to arrive sometime next week, just in time for me to go to Florida and help Pop-In-Law to clean out his garage and not get a chance to do anything with them.
Stay tuned!
Thursday, April 26, 2012
4-4-0 Conversion, Part 2
When we quit last time the loco was all apart and ready for the strip bath. In this installment we will disassemble the tender so that the tender shell can be stripped as well.
A note on paint stripping, I use 91% IPA (alcohol) available at any pharmacy. Be careful with it, though because plastic parts left in the alcohol too long will tend to soften. While I was stripping the loco I managed to break off one boiler stay (the rod that goes from the smokebox to the front of the pilot deck), the pilot and the bell. All of these will have to be replaced, I was going to replace the bell anyway because the one that comes on the loco looks awful big and clunky, but it also warped the loco body a bit.
At any rate, when we last saw the tender we had the trucks removed. All that is left to do is remove the red brush retainer:

and then the brushes. I work a jewelers screwdriver underneath them to pry them up, this keeps them from bending so that they will lay flat along the tender bottom when they are reinstalled.

After the brushes are removed, run a #11 Xacto blade around the perimeter of the weight on the front and pry it out.

The motor fills the entire tender, which is why the tender is slightly oversize for the model - it had to be in order to fit the motor.

Pull the motor out of the tender body part-way. It will slide all the way out but first...

you want to mark the top of it. If the motor goes in upside down the loco will run backwards, easy to fix for sure but just as easy to prevent in the first place. A dab of paint on the top as you pull the motor out and you will know right away how to put it back in.

The tender shell is now ready for stripping. Put all of the other pieces in your parts box, minding that the motor magnets will attract all the steel screws and side rods that we took off of the loco in the last installment. A plastic bag to hold the screws is not a bad idea anyway, and it will keep them from sticking to the motor.

I found it interesting to note that the loco body was molded in white, but the dome and stack were black plastic. I also found it interesting that the tender body was molded in clear plastic.

Now is a good time to paint the tender, but I would hold off on painting the loco until the narrowing is complete. You are going to be grinding into the wheel wells, and fresh paint will just get ruined in the process. The tender can go back together except for the trucks after the paint is dry.
That's enough for today. Next time we will narrow the wheels, pony truck and loco frame and then we will narrow the loco wheel wells to fit the new narrowed drivers. After that the loco can get painted and go back together.
See you next time!
Saturday, April 21, 2012
4-4-0 Conversion, Part 1
The victim:

This is the Bachmann 4-4-0 in N scale, in the old Jupiter paint. Note the large drive shaft between the loco and tender. The newer versions of this model have a thinner driveshaft and the paint is in blue and red to more accurately depict the Jupiter as she is now believed to have looked on the day of the golden spike ceremony at Promontory Point, Utah.
The Bachmann 4-4-0 comes in several paint schemes and in a couple of different configurations; straight stack and balloon stack. Older versions of the loco can sometimes be found for a fairly cheap price at train shows, but I have seen them go for ridiculously high amounts on that well-known auction site. If you can find one that runs decently for cheap it is an inexpensive way to get into Nn3, but be warned...it's a gateway locomotive. Before you know it you will be ordering kits from Republic Locomotive Works, then you will be getting Marklin Z scale mechanisms for your conversions, and then it's all downhill from there. But I digress.
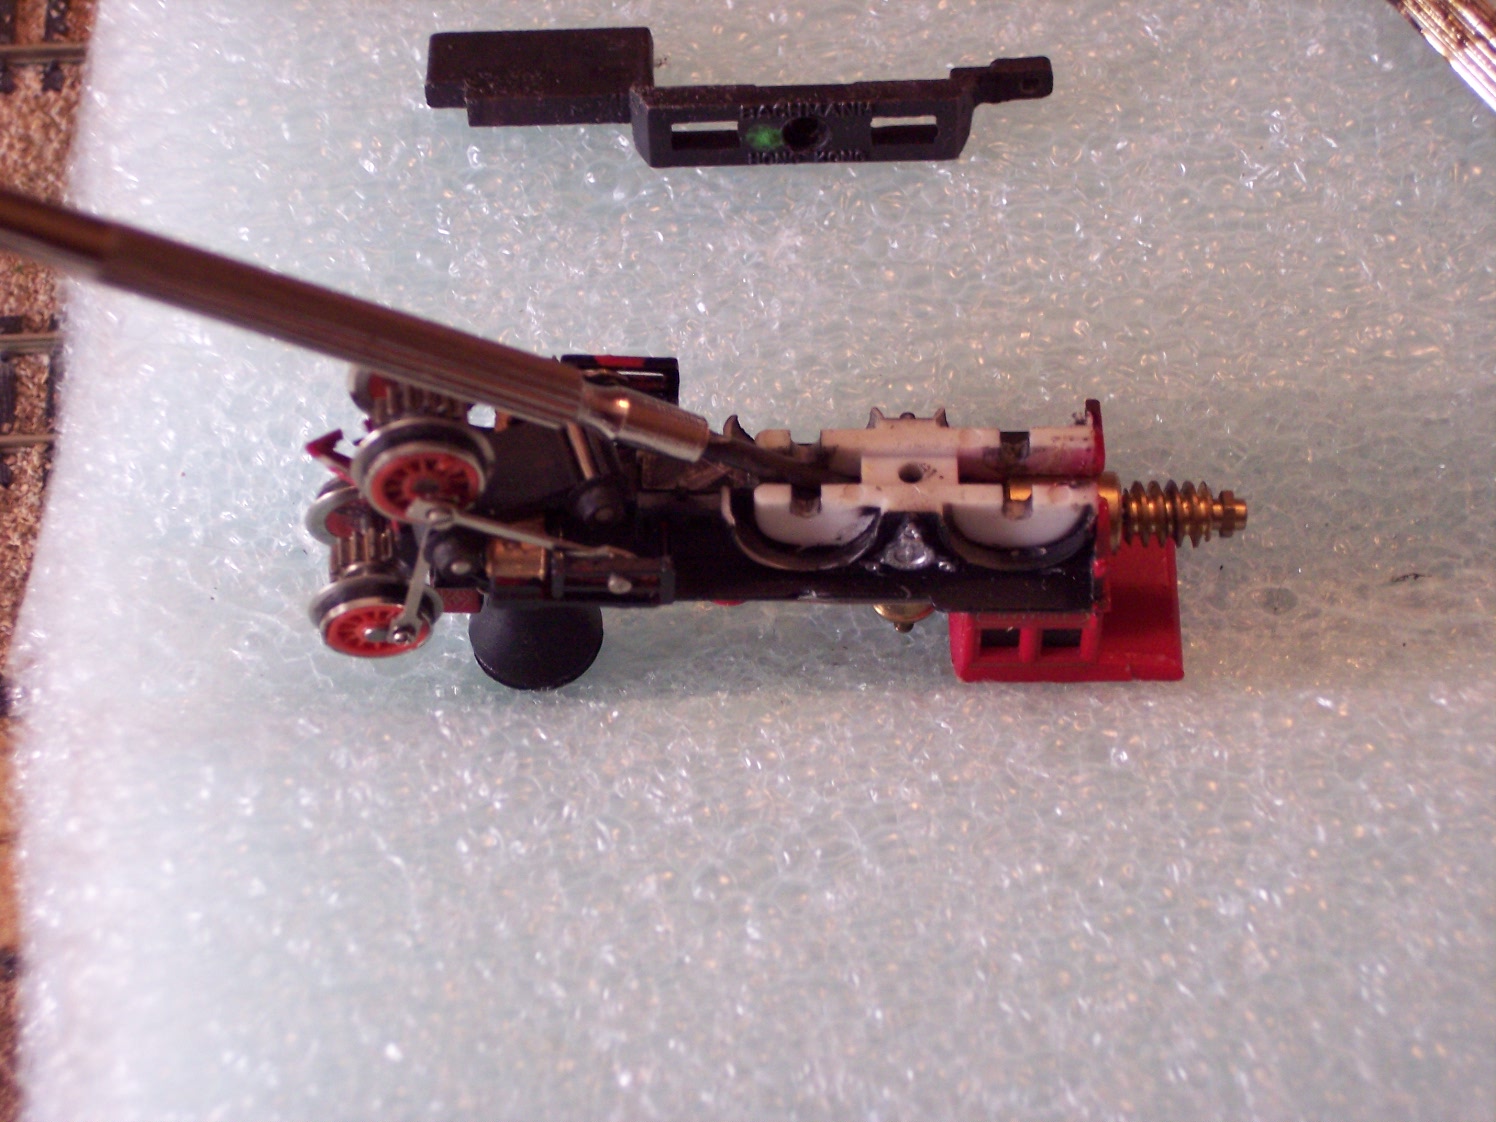
The first step is to disassemble the locomotive. First remove the tender coupling screw:

Set the tender aside. Remove the bottom plate screw on the locomotive:

Next, remove the bottom plate and swing the drivers out of the way. The worm gear can be pushed out of the back of the locomotive.

Now pry the supports out of the valve gear hangers:

The steam chests will slide off of their tabs on the locomotive body.

Put the locomotive body, worm gear and bottom plate into your parts box. You will deal with them later. For now we will continue the disassembly of the running gear.

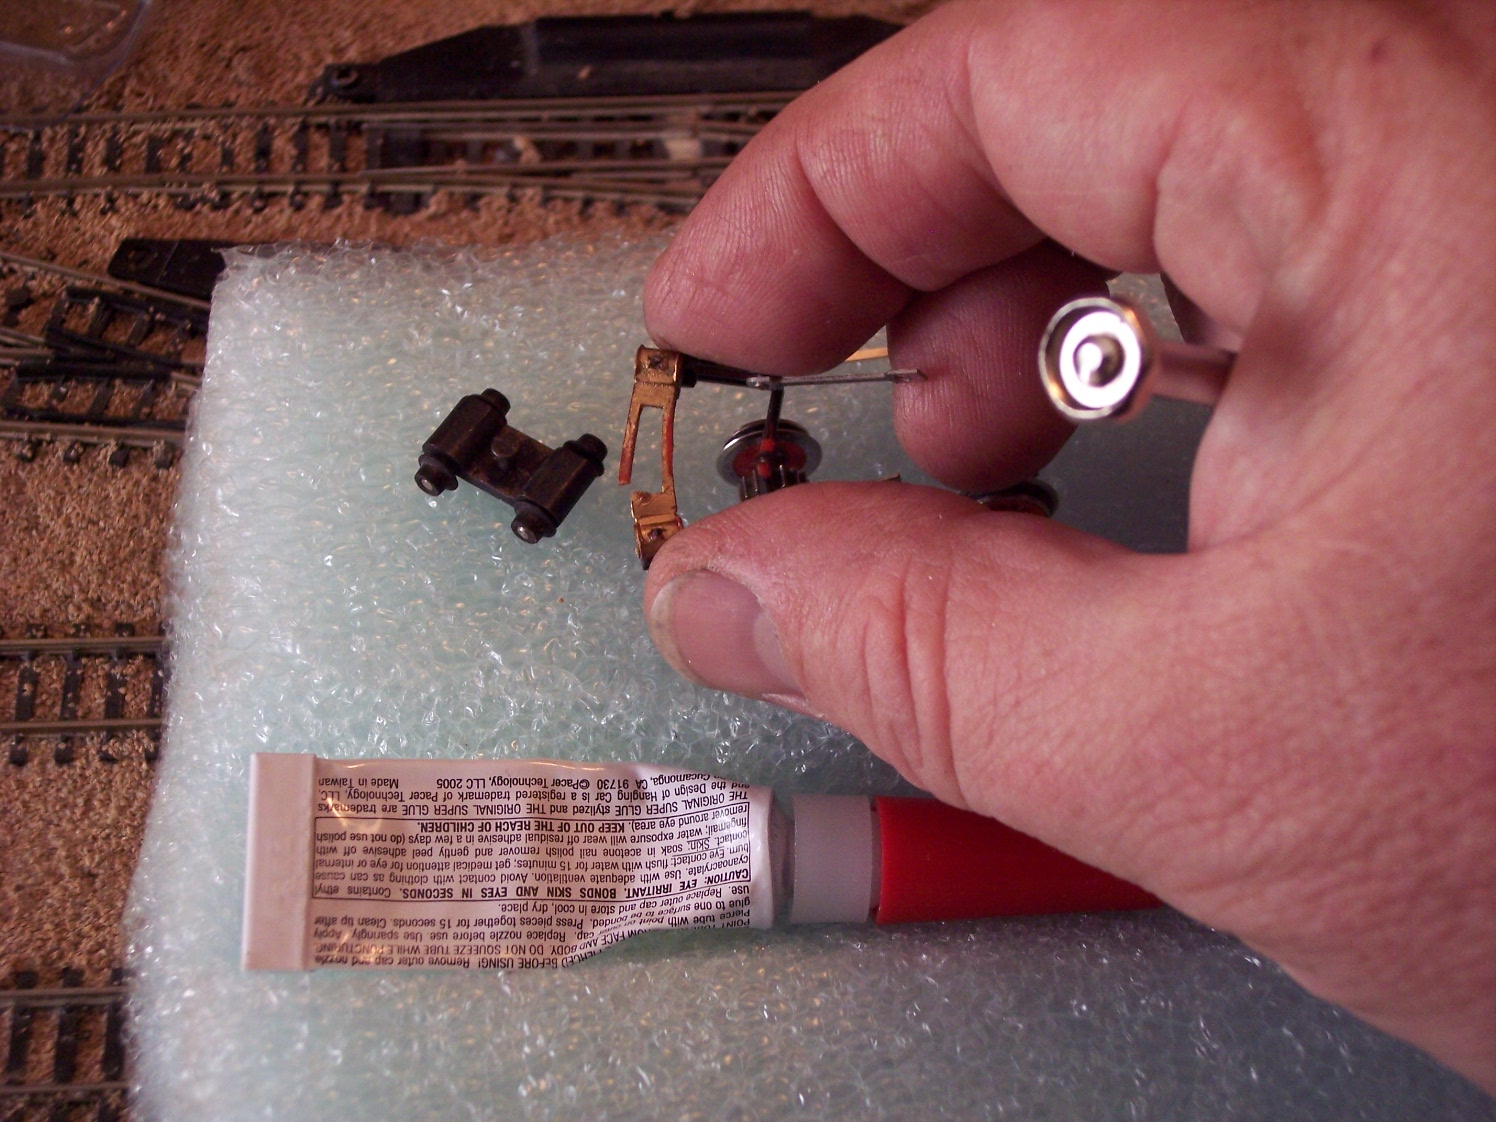
Remove all four screws from the drivers and remove the side rods. Be careful not to lose any of these screws! Put them and the side rods into your parts box.

Now remove the pony truck from the valve gear. You might find it easiest to cut one of the connecting bars to do this.

Now pry one of the wheels off of each axle and remove the axle from the pony truck frame.

This completes the disassembly of the running gear. Put everything into your parts box, we will disassemble the tender next.

Remove the tender truck screws and lift the trucks off of the tender. Mind the truck springs, there are two of them for each truck and they will get lost very easily.

Next remove the coupler from the coupler pocket. You will be fitting a Z scale coupler when you are all done, so these parts will not be used again.

Note the coupler spring...looks a lot like a truck spring, doesn't it? It can be used as one in a pinch.

The tender body does not have to be disassembled any further than this, it contains the motor and that is about it. If you want to take it apart to paint it be sure to mark the motor so that it goes back in the same way, if it goes in upside down the locomotive will run backwards. I'm going to take this one apart so that the tender can be stripped, but not today. Put everything in your parts box, we're done for today.
The locomotive body can be stripped for painting as is, the only thing left to do if you must is remove the weight from the cab. It is glued in place, work a #11 Xacto blade in and around it to break the glue bond and it will slide right out. We won't be covering that, I'm sure you can figure it out on your own.
In the next installment we will disassemble the tender so that it can be stripped for painting. In the third installment we will be narrowing the locomotive drivers and bottom plate and cutting into the locomotive body to fit them. After that we will narrow the pony truck, put everything back together, and then the locomotive will be done. In the fourth installment we will reassemble the tender body, narrow the tender trucks and install the Z scale coupler, and then we will join the tender and locomotive back together and we will be done.
Or, at least, that's the way I have it planned out.
It should be fun!

This is the Bachmann 4-4-0 in N scale, in the old Jupiter paint. Note the large drive shaft between the loco and tender. The newer versions of this model have a thinner driveshaft and the paint is in blue and red to more accurately depict the Jupiter as she is now believed to have looked on the day of the golden spike ceremony at Promontory Point, Utah.
The Bachmann 4-4-0 comes in several paint schemes and in a couple of different configurations; straight stack and balloon stack. Older versions of the loco can sometimes be found for a fairly cheap price at train shows, but I have seen them go for ridiculously high amounts on that well-known auction site. If you can find one that runs decently for cheap it is an inexpensive way to get into Nn3, but be warned...it's a gateway locomotive. Before you know it you will be ordering kits from Republic Locomotive Works, then you will be getting Marklin Z scale mechanisms for your conversions, and then it's all downhill from there. But I digress.
The first step is to disassemble the locomotive. First remove the tender coupling screw:

Set the tender aside. Remove the bottom plate screw on the locomotive:

Next, remove the bottom plate and swing the drivers out of the way. The worm gear can be pushed out of the back of the locomotive.
Now pry the supports out of the valve gear hangers:

The steam chests will slide off of their tabs on the locomotive body.

Put the locomotive body, worm gear and bottom plate into your parts box. You will deal with them later. For now we will continue the disassembly of the running gear.

Remove all four screws from the drivers and remove the side rods. Be careful not to lose any of these screws! Put them and the side rods into your parts box.

Now remove the pony truck from the valve gear. You might find it easiest to cut one of the connecting bars to do this.
Now pry one of the wheels off of each axle and remove the axle from the pony truck frame.

This completes the disassembly of the running gear. Put everything into your parts box, we will disassemble the tender next.

Remove the tender truck screws and lift the trucks off of the tender. Mind the truck springs, there are two of them for each truck and they will get lost very easily.

Next remove the coupler from the coupler pocket. You will be fitting a Z scale coupler when you are all done, so these parts will not be used again.

Note the coupler spring...looks a lot like a truck spring, doesn't it? It can be used as one in a pinch.

The tender body does not have to be disassembled any further than this, it contains the motor and that is about it. If you want to take it apart to paint it be sure to mark the motor so that it goes back in the same way, if it goes in upside down the locomotive will run backwards. I'm going to take this one apart so that the tender can be stripped, but not today. Put everything in your parts box, we're done for today.
The locomotive body can be stripped for painting as is, the only thing left to do if you must is remove the weight from the cab. It is glued in place, work a #11 Xacto blade in and around it to break the glue bond and it will slide right out. We won't be covering that, I'm sure you can figure it out on your own.
In the next installment we will disassemble the tender so that it can be stripped for painting. In the third installment we will be narrowing the locomotive drivers and bottom plate and cutting into the locomotive body to fit them. After that we will narrow the pony truck, put everything back together, and then the locomotive will be done. In the fourth installment we will reassemble the tender body, narrow the tender trucks and install the Z scale coupler, and then we will join the tender and locomotive back together and we will be done.
Or, at least, that's the way I have it planned out.
It should be fun!
Thursday, April 19, 2012
Stay Tuned
The Bachmann has arrived for its transformation, which will begin this week. It runs OK but could probably use a good cleaning and oiling. It will certainly get that during the conversion.
Thursday, April 5, 2012
What The Heck Am I Thinking?!?

For some reason I've agreed to convert an N scale Bachmann 4-4-0 to Nn3.
I've done a couple of them so far, I sold the best running one and the pictured one makes regular laps around my Nn3 oval. It doesn't back up very well, but all in all, especially considering the extremely reasonable price (I picked it up for $15 at a train show), it's a pretty good loco for the money.
This one started out as the Union Pacific 119, the other one I did started out life as the Jupiter. Since these models were made Bachmann has redesigned them with different paint, better motors and drive shafts. Note the rather large drive shaft on this one, it makes problems when converting them to run on tighter curves.
Garth Hamilton used to have a pretty good tutorial on doing this but I can't find it now. There doesn't seem to be a whole lot of information anywhere else on the web, either, but there are bits and pieces here and there. That is a shame because the Bachmann conversion is probably the cheapest way to get into Nn3, even though it isn't for the beginner.
Because of the lack of information regarding this conversion I'm going to be taking plenty of pictures during this conversion and documenting the entire thing start to finish. That way if anyone else wants to try it out I can just point the way to the post, or series of posts. This will be the first set of posts with a label.
I guess it is a good way for me to get back into modeling, even if it is just a little bit.
Subscribe to:
Comments (Atom)
