Showing posts with label Trackwork. Show all posts

Saturday, September 21, 2019

Up And Running

I think I have the trackwork all squared away on my T-TRAK modules.

I built a standard T-TRAK end cap (180 degree curve) so that I could make a complete oval with both standard and narrow gauge tracks. I hooked everything together...or I tried to at least. I ran into troubles right away.

First I had trouble connecting the narrow gauge track. Aligning two tracks on standard T-TRAK modules is not so bad, get a double crossing track or a piece of double track with 33mm spacing and check it on each end, easy peasy. However, when you add a narrow gauge track at a higher elevation and setback you really have to pay attention to details because everything has to align in all three dimensions. If not, connecting the modules is troublesome when it's not downright impossible. And of course this was the case, I had some modules that would connect straight away with each other in one configuration but went from difficult to impossible with others or in a different configuration.

So, I had to spend some quality time with the template and shims to get everything at the exact height and depth. I had several end pieces that had the narrow gauge track either higher or lower than the others so they had to be carefully aligned, in some instances the end had to be shaved away to lower the track and in other cases it had to be shimmed higher. I also had to adjust a few tracks end to end to make sure the 2mm spacing between modules was consistent through the depth of the modules in every configuration.

I finally got everything straight, and I checked each module by connecting it at each end with every other module. Every module will connect in various configurations (really there are only about twelve possible connections since two of the modules have curved narrow gauge track and straight standard gauge and will only connect to each other in one specific combination) so it should all be good now. And then I ran trains...or attempted to...and found other issues to deal with.

First I had power delivery issues. I have connected the Tamiya connectors, which is what both Kato and Rokuhan uses on their power connector tracks, to my power packs so that I can connect them easily to the tracks. On some of my modules the wiring was less than stellar, so I had to correct them. I checked all three connections on each module, which took a lot of time but was well worth the effort since I know they are all good now.

With the power delivery gremlins banished I was able to put a train on each track and started running them around. It was then I found tracks not connected correctly, or misaligned, within the modules. So I spent a couple of minutes correcting those issues. Then I had a bad hump on the outer track on Dragon Bridge, so it had to be pulled up, the roadbed leveled off, and the track re-laid. Then I had a narrow gauge hopper consistently derailing...but that ended up being a car issue and not a track issue.

Finally I had everything running smoothly, so I ran some trains for a while.

I did eventually put some cars on the standard gauge locos and ran them without difficulties. I also ran multiple engines and consists just because it was fun. I took this little video* and ran some trains all afternoon. Finally I disassembled the modules and put them away.


Now I just need to get the scenery done on them, and then maybe I can get everything evaluated and approved for running in the shows.

*Thanks to recent You Tube policy changes I have removed all videos from my You Tube channel.

Tuesday, October 18, 2016

That's Better

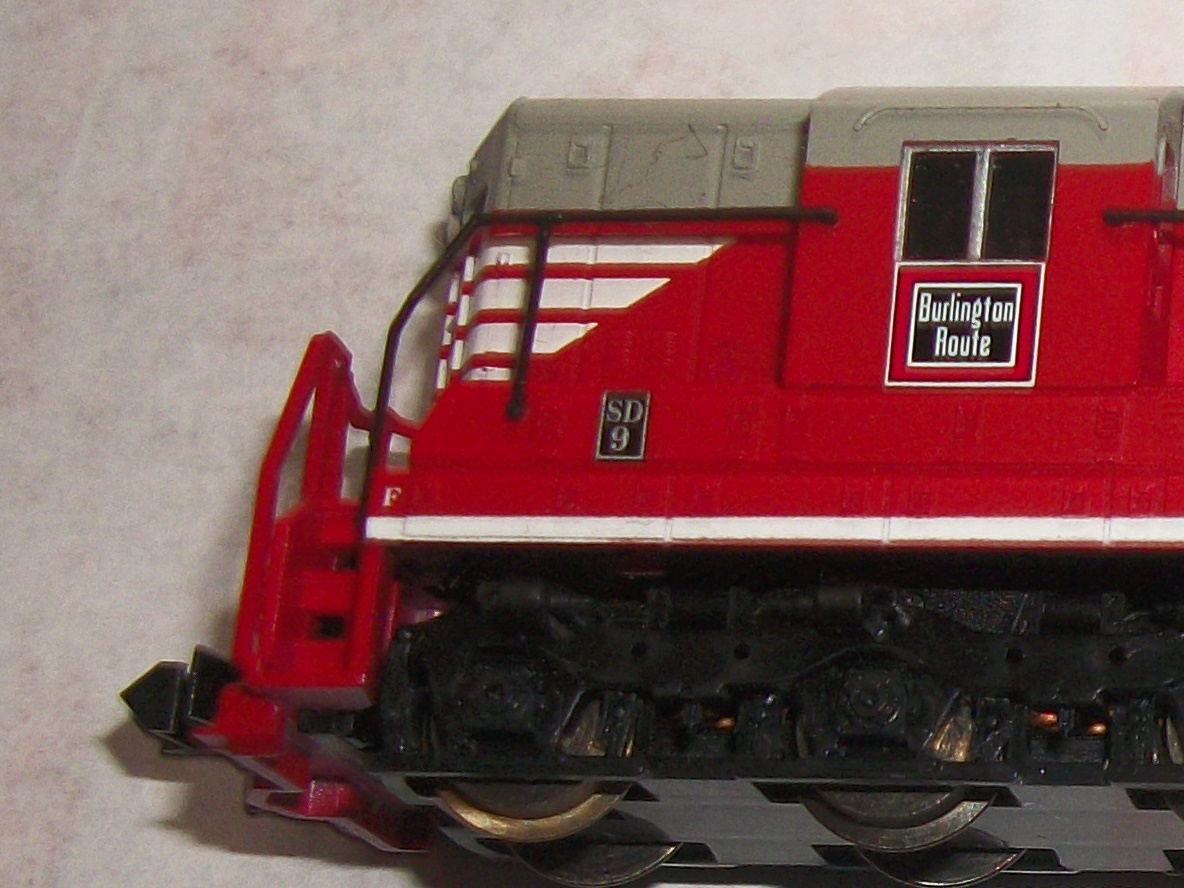
Ever since I did the truck modification on my SD7/9 (whatever it really is see picture below) and attempted the first DCC decoder installation I have been disappointed with the pulling power of the locomotive. Before I started messing with it the darn thing would pull like a plow team, but since then it has been slipping and losing traction all over the place.

I thought maybe the wheels were dirty, so I picked it up, flipped it over and started checking the wheels...only to find out all three sets of wheels on the rear truck were freewheeling. D'oh! It seems that during the reassembly I let the idler gear that transmits the power from the worm gear (the worm is the one on the motor, the worm gear is the one that the worm engages) to the wheel gears slip to the wrong side, so it not only was not engaging the worm gear, but it also was not engaging the wheel gears.

Since the truck modification more or less permanently installs the trucks to the frame I had to remove the worm from the tower and fish the worm gear out through the top. I was then able to slide the idler over into the right place, reinstall the worm gear and the worm, and voila! the damn thing pulls like a plow team again.

This is a good thing since I decided that I didn't have a team track at my freight station and really needed one. This of course means I have to have a flatcar or two and maybe a few more boxcars and such so that various deliveries can be made to the team track. More cars means the engine has to be able to handle more load, which it certainly couldn't do as a Front Truck Drive only locomotive.

After initially working well, however, the turnout I put on the team track has decided it really doesn't want to conduct power to the diverging route any more. I should have put a feeder on the team track anyway, so it looks like the easiest corrective action will be to do just that. I also have a rail joiner or two that isn't conducting, so either I need to put in more feeders or I need to solder some joiners.

Either way, it looks like I have a future engagement with my soldering iron.

UPDATE: Well, it looks like that question is solved at least. And, since there is an F on the short hood side it looks like the Burlington ran their locos short hood forward, which means I have it wired backwards. Of course.

Thursday, September 24, 2015

SCARM

SCARM is the acronym for Simple Computer Aided Railroad Modeling, free track planning software that encompasses most every scale (including TT and FastTracks turnouts). I use it because it is simple and easy to learn, and best of all, FREE.

I'm happy to announce there is a new version available here. I've also added a link to the SCARM blog where you can learn more about the software and find some tips and tricks for using it. All of the layouts that you see here were created in SCARM. I highly recommend it for anyone who is looking for track planning software.

(I was not compensated in any way for this article, I am just a satisfied user.)

Saturday, August 29, 2015

Real Estate Disputes and Other Matters

My train room is being taken over by closet space.

Ever since the charming and lovely Mrs Hades agreed to take up space with me we've been moving things around. What was big enough for one person (me) has proven insufficient for two, so along one wall of the "train room" there is now shelving and clothing.

Everything that was along that wall has been moved to the opposite wall, where I'm pleased and somewhat surprised to report it all fits...tightly, to be sure, but it fits.  The large 4x8 N standard layout has been disassembled and all that is left in the center of the room is the uncompleted Nn3 layout.

Unfortunately it looks like that may have to find another place to live as well, or be disassembled and the parts used for something else. (Maybe I can finally do the long-planned Saltillo modules, complete with the NARCO quarry branch.) Also on the block is the proposed Z scale layout, I just don't have the room for it as things stand now.

Two things I am looking at is double decking and reducing by one the number of standard gauge N scale layouts. If I reduce the number of N standard I will be finding somewhere to put the rock quarry. I could then put the Z scale in the corner and put the Nn3 on a shelf over the top of the standard N.

Losing the quarry wouldn't be a huge blow. It has given me some experience in working with foam at least, and the performance of the Bachmann set that prompted the layout has, as is typical with Bachmann 4-4-0's, been disappointing to say the least. I can at least use the benchwork for one part of the Z scale, so that isn't a total loss either. Finding civil war era buildings for the rock quarry has been problematic as well, and the effort would be better served finishing the scenery on the other standard N scale layout.

But enough about that. Moving has been completed enough to take a little break at least, so I've been spending time in the train room tuning engines. I've finally gotten all of my Pacifics to work reliably and I've even been able to get my two Atlas 4-4-0's to run decently again (the unpainted one threw a tire after being painted and the undec didn't run well out of the box).

I've been working on the 2-8-0's as well, they don't like tight corners. The problem is some Bachmann engineer in a fit of brilliance decided that metal would be a good material to cast the cylinder fronts out of, so when the pony wheels touch it they short out. I've had to carve and cut them away to clear the pony truck wheels, they look terrible up close but after they were painted they are hardly noticeable from operating distance, and now they will actually run on the 11" radius curves like they are supposed to.

Last but not least I added a siding to the backside of the Clarinda modules.  I've been thinking of doing that for a while because it adds some operational flexibility. Now I can have a passenger train laying in wait to take a few laps while the freight train is on a siding, either in the front or in the back. I've tried it both ways and it is working as planned.

Next week I hope to get some of the scenery done on them. We'll see how that goes.

Saturday, January 31, 2015

I've Been Working On The Railroad(s)

For the past couple of weeks I've been laying Fast Tracks turnouts on the narrow gauge, wiring them up and hooking them to Caboose Industries ground throws. I've found that the 224S, designed for Atlas code 55, is perfect for Nn3.

So far all the turnouts needed for the yard are back in. They were originally Marklin turnouts and it took a bit of fitting for the Fast Tracks turnouts to fit, but all has been arranged to work. Some of them still need a bit of tweaking but so far they work pretty good.

I brought a new plastic drawer set home today and cleared off both the 4x8 table layout and the narrow gauge that sits on top of it. The control panel has been removed from the 4x8 and the wiring has been all cut from underneath. It is now a collection of track on a piece of plywood, nothing more.

The only thing I will save is the turntable. I have no plans for it, but it will go in a box with the roundhouse and perhaps get used on something later. Tonight when Eldest Son gets home I'll have him help me take the narrow gauge off the top of the 4x8 and then deconstruction of the table will commence.

I'm also going to start clearing some of the things out of the room that I have never used and have no plans for, there is quite a bit of that hanging around. I'll probably end up with a bunch of cabinets lining the outside of the room with the layout(s) on top of them.

The clearing of this first permanent layout that was never quite finished will give room for the other projects that I have in the works, and maybe I'll get one of them done before I'm all through. I have three in the works at present; the Clarinda module pair, the rock quarry, and the narrow gauge.

On another note, the track has been ordered for the Z scale layout. I haven't figured out where it will live, but I'll make room for it. I'm using Micro-Trains Micro-Track so that I won't have to hand lay any turnouts (the AZL Mikado is very finicky about its track work, it won't run on the narrow gauge but the GP7 will) and it will be a city scape.

The tentative track plan is below.

And that's what I've been up to lately.

Saturday, January 19, 2013

PC Board Ties

Since I am in the long process of disassembling the N scale layout to make room for the new (it's going rather slowly) I've decided to work a bit on my 3x7 Nn3 layout a bit.  It consists of a double loop with crossovers, one siding to the bottom of a coal chute for locomotive refueling and a siding on the opposite side of the inner loop to bring coal into the top of the refueling station.

To complete the layout I need three each left and right Nn3 turnouts, and as you may recall I opted to get the FastTracks fixture and jigs to build them. The turnout building went well, all of them have been tested to make sure the electrical isolation is good and the wheels actually roll through them.  When it came time to try to mount them to the layout is when things got slightly sideways.

I attempted to drill through the throwbars only to find the 1/32" PC board ties don't drill well. I ended up drilling one in half and then I called it quits. I have ordered PC board tie materials for throwbars that is 1/32" thick but 1/10" wide that should be a lot easier to drill holes in for the throwbar actuators. I am going to attempt to use Caboose Hobbies power routing ground throws since the frogs have to be powered.

When the PC board ties arrive I will be changing the throwbars on all of the turnouts. Maybe then I'll get something going on the little layout.

Tuesday, February 15, 2011

Turnouts, part 3

All five turnouts are now complete. Next I build the framework and module tables. I am planning on going with two standard Nn3 modules in the size of 1'x4', 1x3 framework and 1" foam on top. Track will be at the 6" centerline as per Nn3 Alliance standards.

I will also have to scratch build some structures, but I'll deal with that issue after the track has been planned out, the road bed has been laid and the whole shooting match is ready for scenery.

I haven't been able to find out if there are going to be any Nn3 clubs at the convention, so I am not sure how to go about getting the modules entered. First things first though, they have to be built before they can be entered.

Monday, November 1, 2010

Turnouts, Part 2

So far I have built two turnouts, one left and one right, with the Fast Tracks jig. The toughest part is gapping the point rails after everything is soldered together. So far the X-acto razor saw is doing the job just fine.

I ordered a stock rail filing tool to assist in the turnout building, it should be here soon. This is the first time I have built turnouts, and the jigs certainly help the process. I don't know if I would have wanted to tackle the project without them.

Monday, October 11, 2010

Turnouts

The package containing the Fast Tracks turnout kit is waiting for me at the post office. I'll be picking it up today and perhaps I'll be building some turnouts this weekend.

The shed has also arrived and is being filled with things that previously had no real place to be stored. The train room will be getting cleaned out this weekend as well.

There are eleven months remaining until I must have the Saltillo modules finished.