Monday, October 3, 2022

Cotton Brute Restoration: Addendum

The gears I ordered from Germany have arrived. They were a perfect fit, as anticipated.

I replaced the gear in the donor locomotive and now have two Minitrix U28C locomotives, one in Southern Pacific and one in ACL livery, in perfect working order. I also have two spare gears for the Minitrix U28C/U30CG/U60CG chassis.

And this should conclude the Cotton Brute saga. Thanks for following along.

Sunday, September 25, 2022

Cotton Brute Restoration 7

This weekend, for the first time in almost 4 decades, the Cotton Brute once more took to the rails.

Old 97 Rail Days, commemorating the wreck of Southern Railroad mail train 97 on September 17, 1903, was held in Danville Virginia at the Pepsi Building on the Danville Science Center campus. The Danville Science Center also encompasses the still active passenger station along what is now the Norfolk Southern line, and has been commemorating the 1903 wreck for the past 20 years.

Part of that event for the past 20 years has been an NTRAK layout made up of modules from 4 of the ten clubs from the Eastern N Lines Partnership; North Raleigh Model Railroad Club, Richmond Area NTRAK, Lynchburg Area N Scalers, and New Jersey Southern N Scale. Lynchburg has since dropped out of the event because they have gone from being an NTRAK club to being a T-Trak club, but we had one member from there at the show.

The first time on the rails was a bit of a mixed bag. Everything seemed to work well (except that the volume, more than adequate in a quiet train room, was woefully inadequate in a noisy show environment) as the Brute traversed the track and then, with no explanation, it coasted to a stop and sat at idle. The horn and bell worked fine, the lights turned on in the proper direction, but the locomotive refused to budge. 

The problem was attributed to an issue with DCC decoders and Back EMF (BEMF) on coreless motors, like the one that powers the Brute. Back EMF measures the current load on the motor and adjusts the actual locomotive speed and engine sounds based on the throttle settings. The idea is to prevent the locomotive from slowing down or speeding up excessively when traversing grades. The difference in the current draw of coreless motors as opposed to traditional iron core motors is apparently significant enough that it throws the BEMF settings off.

The answer was to adjust the BEMF settings to basically nullify the function. Once that was done the Brute operated very well, with the only issues being it's refusal to negotiate tight curves (the locomotive is a little over 7 actual inches long) and the alarming tendency to bottom its fuel tank out on any connecting tracks that were bowed upwards. The layout was modified to accommodate the locomotive and after that it ran just fine.

Pictures and videos have been taken, but not by me. Unfortunately I appeared on the scene Sunday morning just a little late to witness the show, but I did get to see the video and I am pleased to have been a part of the results. Sadly, since I did not get any photos of the loco in operation, I have none that I can share with you. However, I am happy to say that forthcoming articles will have pictures and perhaps a video or two as well.

I was asked what I would charge for this job and I refused payment. I have gotten a lot more out of this project than I put into it, and I told the board if they felt it necessary to compensate me they could come up with a figure and credit me with a donation to the club in that amount.

So what did I get out of this project, you might ask? First, I got a chance to be a part of the history of the Cotton Brute, a locomotive I have read about in NTRAK (now NRail) publications but never thought I would get a chance to see in person. Second, I got a chance to expand my modeling skills. I am very proud of the way the reconstruction of those front steps went, for instance, and having done this gives me the confidence to attack similar tasks that need to be done on a couple of my own locomotives. Last but not least is the pure satisfaction of seeing this behemoth tow a cut of cars around knowing that I was the one that put it back on the job. 

And that is something that is worth way more than the time and small amount of money I spent on this project.

Saturday, September 17, 2022

Cotton Brute Restoration 6

 It is done.

I was up early this morning because I worked Thursday night, so Friday I slept when I got home. I did take a bit of a nap last night, but about 1 AM I was wide awake. Perfect time, I thought, to finish the restoration of the Cotton Brute. 

As I mentioned in my last post, the decoder wiring had arrived and the truck wiring was changed but in the process I had lost a tower gear. Fortunately one of the other club members had a donor locomotive, so Thursday on my way to work I dropped by his place to get it. The donor was a U28C, not a U30CG, but the frames are similar and the trucks are identical so it had the gear I needed. The first thing I did when I started was rob a gear from the donor, drop it in place, and install the truck.

And with that done, it was time to proceed.

The channels that I had cut in the weights for the lighting were first deepened so that the decoder wiring would have plenty of room to fit under the shell. The decoder was put in place and the power and motor wiring was run. I cut another channel in the back of the motor weight so that the positive motor wire could be routed where it needed to go without any danger of fouling the driveshafts. I was able to permanently install all the weights after that because the rest of the wiring would run on top of them.

Next the lights, which had been carefully removed and stored away until it was time for them to be reinstalled, were fitted and wired. The purple and green function wires were rolled up and stuffed into a piece of heat shrink so that some other intrepid soul, someone not me, can put ditch lights in later on if desired. I did make a mistake at this step, though. Can anyone spot what is wrong with this picture?

The speaker wires were tucked out of the way so the shell could be test fitted. It went on with no problems and fit down over the weights as it should, so that meant I had the wiring channels cut deep enough to clear. I then took the shell back off and set it aside so that I could install the speakers one at a time to see which one would work best.

Off to the track it went where I programmed the long address with the side number and selected the proper 5 chime Nathan horn. I tested the sound on both speakers and decided on the 50326 because it fit in the space better. During all this testing I checked the lights and discovered that I had wired them backwards. The rear light was on all the time, but the front light only came on when the loco was put in reverse. It ran the proper direction, so everything else was fine. Back to the workbench it went to get the speaker wired in permanently and correct the headlight wiring.

The wires were then taped down with Kapton tape so that they wouldn't shift as the shell was installed. You may notice the speaker wires are not covered with shrink wrap. I had put a piece of tape over the rear light wires to keep them in place but left the speaker wires free when I was swapping out the speakers for testing, so I opted to just put another piece of Kapton over the joints to insulate them rather than grind more away from the weight to allow for the size of the heat shrink. The joints are offset and well insulated, so there shouldn't be any problems with them.

Back to the track it went to verify the lighting, and then I ran it back and forth a few more times to check the motor operation and the prime mover sound. I don't have anything like the proper radius curves to run this loco, but the back and forth testing went well. I haven't programmed in a speed table, obviously, but I'm not overly worried about that. It's a show loco, so if it runs a bit fast that's OK.

The shell has been reinstalled for the last time, the loco was tested with the shell installed to verify everything is working like it should (the speaker is still nice and loud with the shell on), and then it was put on the scales. Even with the weight removed to fit the decoder and speaker it is heavy, weighing in at 22.4 ounces. That's 1 pound 6.4 ounces, only 1.6 ounces less than it weighed when it first came into my tender care. I'm pretty sure it could still pull more than 500 hopper cars, but I doubt it will be put to that test any time soon.

 And now it has been packaged back up and is ready for delivery to President Wallis so that it can make its debut in Danville next weekend. I have taken the weekend off for Danville so that I can watch it go, I'm looking forward to seeing it run for distance and not just up and down a 3 foot stretch of track. 

I will take some pictures and make my final report on the restoration after that.

Tuesday, September 13, 2022

Oops

 I've lost one of the tower gears for the Cotton Brute. 

I had removed the trucks to replace the wiring. I had used a rather stiff wire and wanted to replace it with the more flexible wire that came in since the last time I updated the blog. I put the new wire on, and when it was time to remount the trucks I only had one gear instead of two. Hours of frantic search proved to be fruitless, this gear has departed for the same place as Micro Trains coupler springs and 10mm sockets.

Fortunately one of the club members has a donor loco that I can scavenge parts off of. Furthermore, it appears as if Marklin, who now owns MiniTrix, actually still has gears for these locos. I have ordered some, but just in case they aren't the right ones, or don't arrive in time, I will be picking up the donor loco tomorrow. If I need to rob a gear from it I can replace it when the ones come in from Germany.

All I have left is to fit and wire the decoder and speaker, so hopefully it won't take me a great deal of time. Either way, I will finish Cotton Brute off this weekend in time for its debut in Danville.

Monday, September 5, 2022

Cotton Brute Restoration 5

 I have three more items to complete on the Cotton Brute and I have a maximum of 19 days to get them done. I want to have the locomotive ready to rock and roll for Old 97 Rail Days in Danville VA, which is happening on the weekend of September 23rd.

Those three items are: fabricating a new fuel tank end to replace one that has gotten lost over the years, hard wiring the trucks in such a way that the wires are not prone to breaking off, and installing DCC.

The trucks were picked to be first because the tank would be much easier to build if the slider pickup on the trucks were eliminated. I had previously tried to just solder a wire between the trucks and the contact pads on the frame, but the wires flexed so much at the solder joints that I feared they would break off eventually.

The trucks are an odd design. There are two geared axles (middle and outer) on each truck and one not geared (the inner wheelset). The dummy wheelset is made of a hideous gray plastic that looks nothing like steel, something that I resolved to take care of while I was there with a bit of steel colored paint. This will do for the outer face of the wheels, but unfortunately nothing can be done for the treads.

The two geared wheelsets have one wheel that is isolated from the axle. Power (actually ground since they are on the left side of the loco) is picked up on the non-isolated wheels and transferred through the axles to the metal body of the truck, which is then fastened both mechanically and electrically to the frame with a metal pin that also holds the truck and idler gear in place. 

Power is picked up on the isolated wheels by way of a slider contact on the backside of the wheel. This contact is a single piece that runs along the bottom of the truck (isolated from the truck frame by a fiber insulator) to the inner end where a finger sticks out to touch a contact pad on the bottom of the locomotive. This finger is the part that had to be eliminated.

The front truck was done first. A hole was drilled in the truck frame and a channel hollowed out to clear the solder joint. Said solder joint affixed a power wire to the contact at the bottom of the truck through a hole in the insulator. The wire fed up through the hole drilled in the truck frame to be attached to the locomotive.

Another hole was drilled in the locomotive frame (fortunately the original part of the U30CG frame, not the depleted uranium tank that joins the two ends) and the wire was fed up through it, leaving a loop between truck and frame to accommodate the truck swing. Once everything was in place a continuity check was done to ensure that the power wire was fully isolated from the frame and that the truck wheels were connected. 

After that the finger was removed and once again the entire circuit was checked for continuity where needed and insulation where not. Once this was successfully tested on the front truck, the rear truck was likewise modified. And with that done, it was time to fabricate the tank end.

The tank end was going to be a challenge because on the Minitrix U30CG that was the donor locomotive there is an air tank affixed to the end..sort of. The only parts of the tank that are actually present are the ends, there is no middle of the tank. This allows the trucks enough room to swing while appearing to be close enough to eliminate any unsightly gaps between the fuel tank and the truck end. This also served to disguise the slider contacts coming from the trucks, which have now been eliminated.

As I was looking through photos of the real-life U30CG however, I noticed that the air tanks were noticeably absent. Likewise, the U30C from whence the U30CG came also had no air tanks. In fact, the only place I found air tanks was on the Minitrix model. 

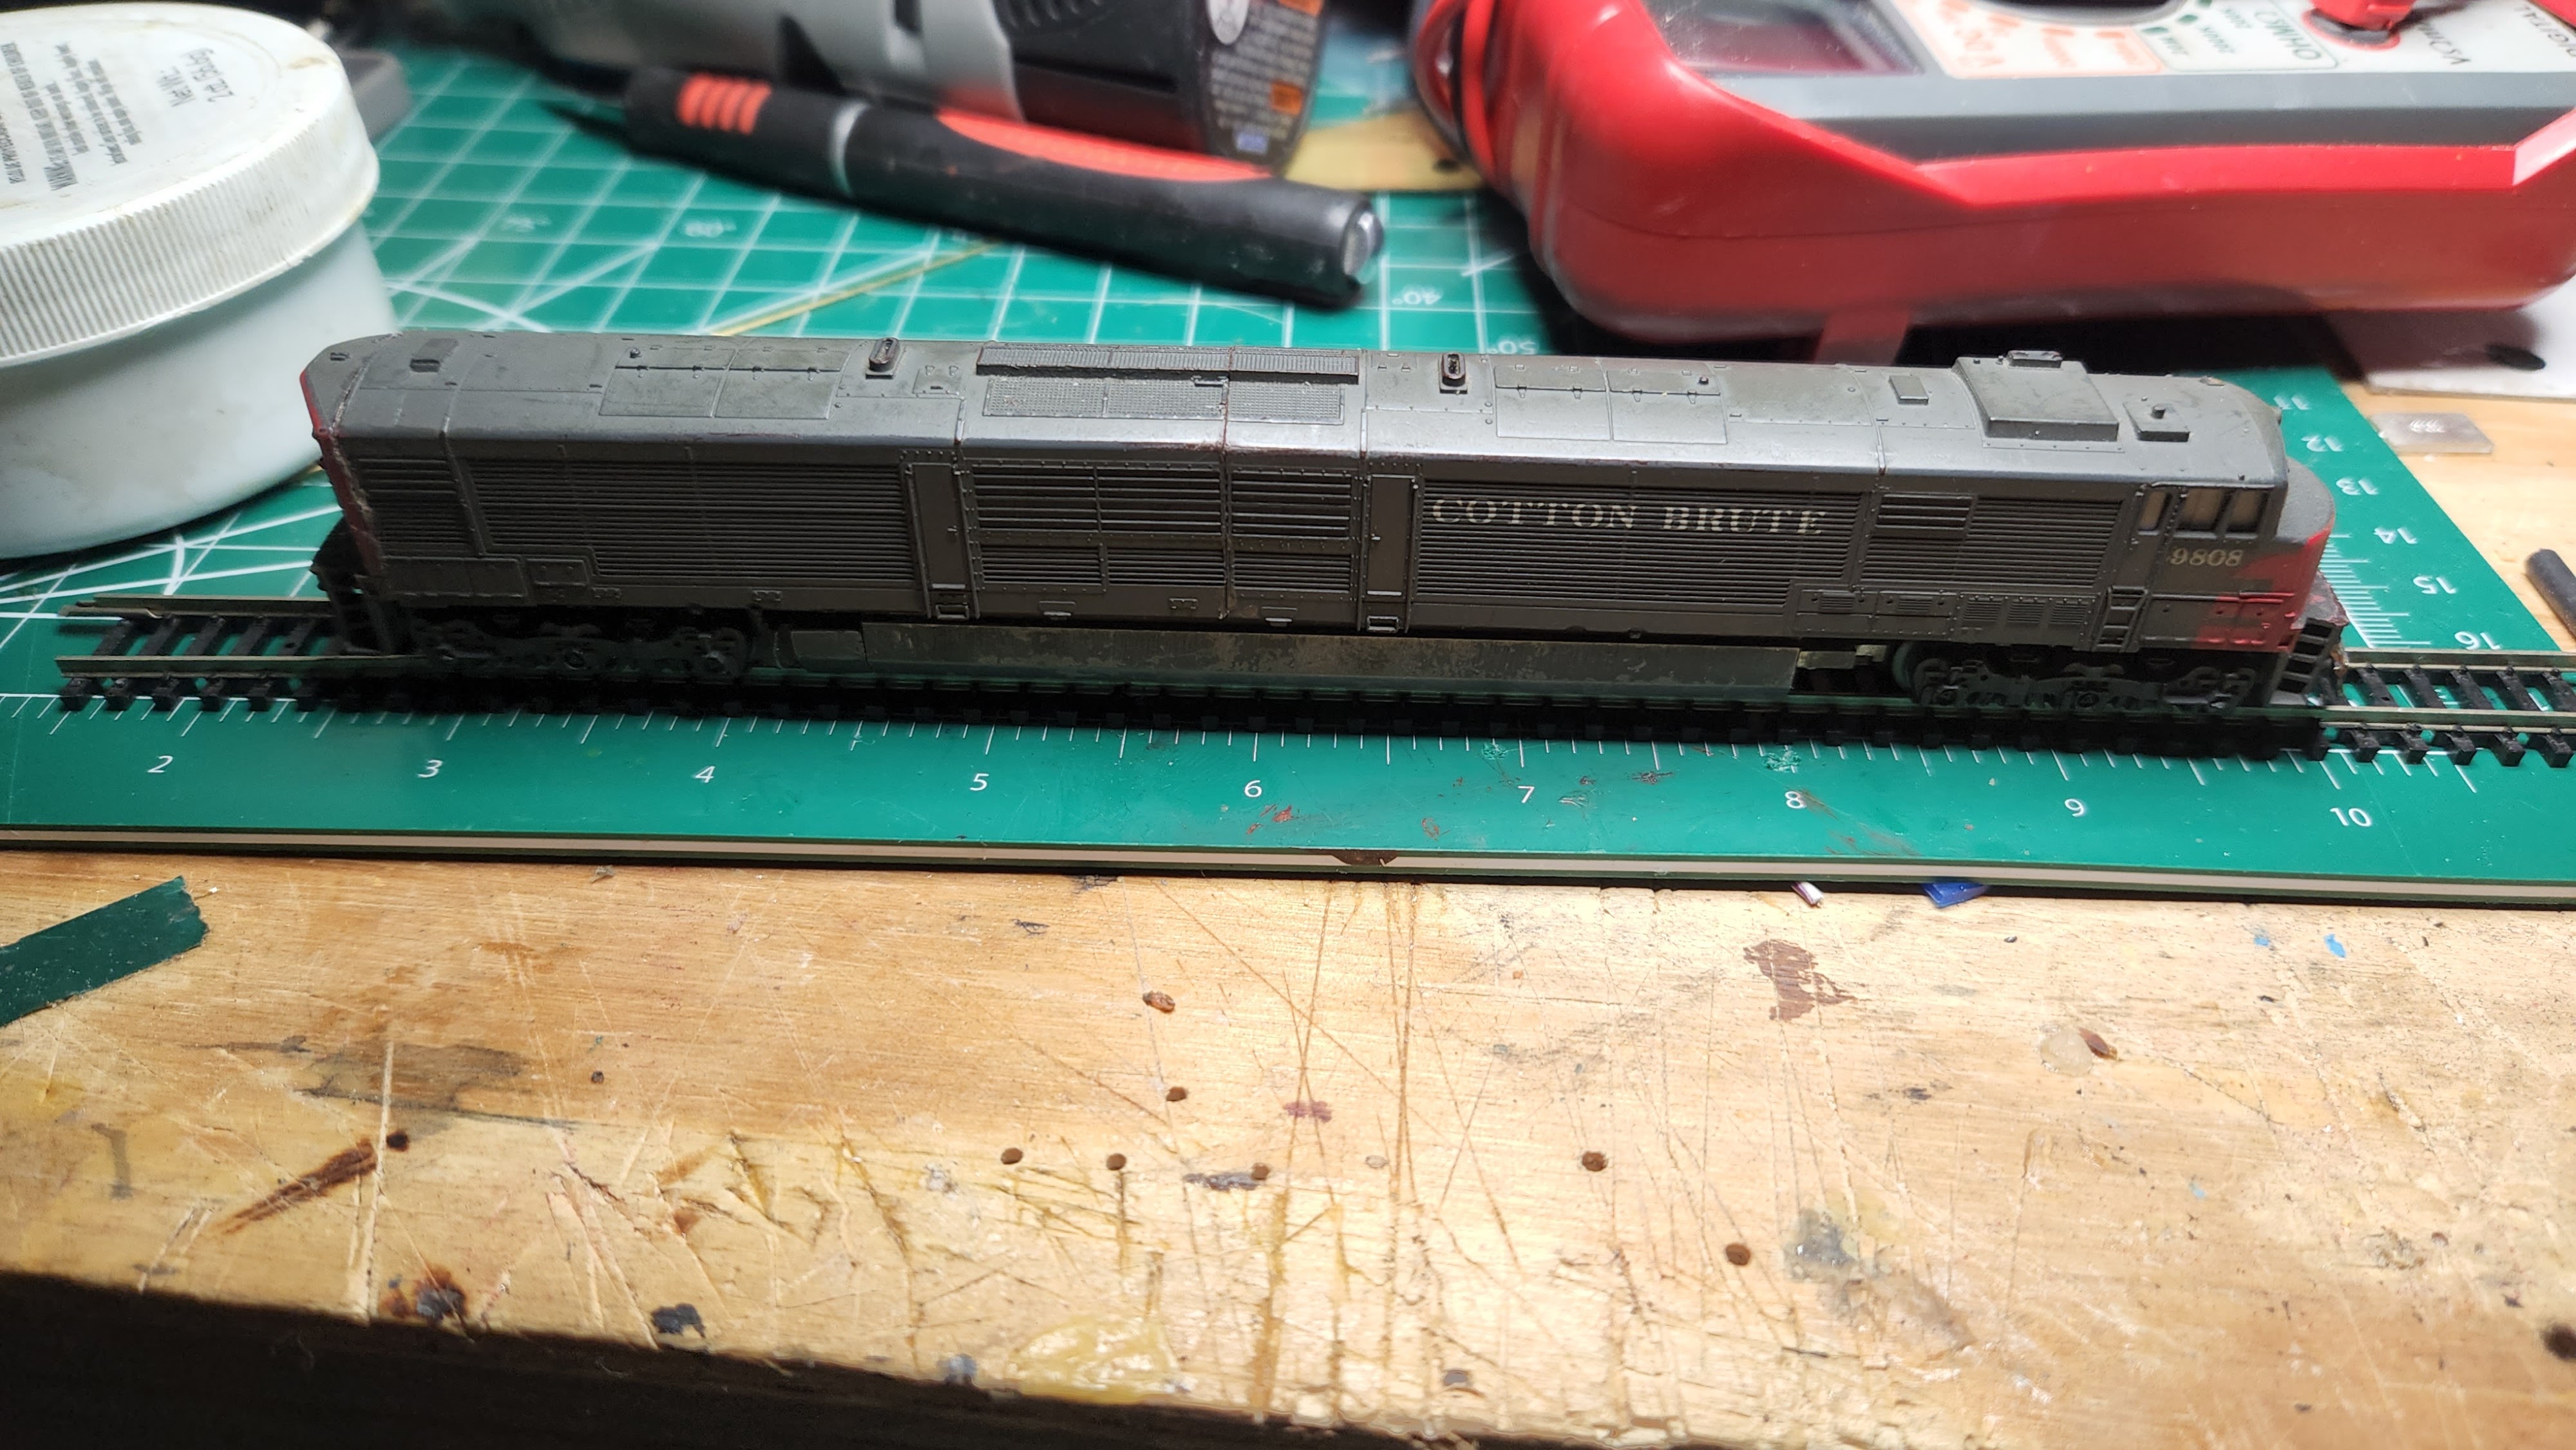
This, of course, made things somewhat easier. Since no air tank was required, I decided to extend the fuel tank end a bit to reach all the way to the end of the leading truck. The tank end was fabricated from sheet styrene and affixed to the leading end of the fuel tank, then painted Cotton Brute Grey. The existing rear tank (complete with fake air tank) was left alone.

With trucks and tanks out of the way, the next step was installing a DCC decoder. At first the plan was to install a simple Digitrax DZ126 decoder, for which there was plenty of room once the weight above the motor was removed. The idea was to get the locomotive chipped and then think about perhaps installing sound at a later date. But, it was reasoned, why do the work twice?

An ESU Loksound 5 Micro and two speakers were obtained and the decoder loaded with U50 sound files (fun fact, Jim Fitzgerald referred to the Cotton Brute as a U60CG). They were then delivered to me for installation.

At first I had thought that I could simply install the sound decoder above the motor in the same manner that the DZ126 installation was planned, but sadly it is just a bit too tall to fit between the motor and the shell. There is a lot of room under that shell but it is taken up by 11 ounces of cast lead weight. Some of that weight would therefore have to be sacrificed to fit the decoder and speaker.

I picked the locations to coincide with weights that could be completely removed and replaced with styrene shelves to hold the components, but when I weight the removed weights I found they totaled 4 ounces, a full quarter pound. The locomotive initially weighed in at 24 ounces (that's a pound and a half) so with the 4 ounces gone it would still be a hefty 20 ounces, but I really didn't want to cut a full sixth of the locomotives weight out. 

On the other hand, I didn't want to destroy the weights that had been so carefully cast by the locomotives creator, but after thinking about it for a while I decided that the locomotive was unlikely to be converted back to DC once the sound decoder was installed. So, the weights were marked and the cutting began.

I would like to note for the record that all lead weight cutting, filing and shaping was done while wearing a respirator mask, goggles and gloves and my hands were thoroughly washed after each evolution. Furthermore, during the cutting and filing processes a shop vac nozzle was duct taped to the vise to remove the dust. The shop vac that I used is the type that can be fitted with a bag, and one was fitted so that the lead dust could be properly disposed of. Always use caution when working around toxic substances like lead.

In all, a total of 1.3 ounces was removed from the two weights to clear enough room for the decoder and the speaker. A channel was also cut along the tops of the remaining weights for the decoder wires, probably another couple of tenths of an ounce. I will install the decoder and then test it with each of the speakers to determine which speaker sounds best. I had considered installing both speakers, one forward and one aft, but I decided I really didn't want to remove any more weight.

This is where the first major snag was encountered. While ensuring enough room had been made for both decoder and speaker I realized that the decoder doesn't have long enough wires to reach the speaker or rear lights. This is a long locomotive. So now I am on hold until the decoder wire I have ordered comes in.

Two out of three items taken care of means that it was still a pretty productive weekend.

Saturday, August 20, 2022

Cotton Brute Restoration 4.5

When I last posted, I opened by saying that matching the paint is the most difficult part of this rebuild.

In this photo, part of the body has been painted and part has not. Can you tell which is which? If I hadn't been the one to do the painting I wouldn't be able to.

For the record, Cotton Brute Gray is a 50/50 mix of Model Color 70.866 Grey Green and Model Color 70.894 Cam Olive Green, available at your local Hobby Lobby. The red is Badger Model Flex 16-153 CB&Q Chinese Red. A shot of Dullcote blends everything together nicely.

When the paint dries completely I will paint the outer uprights of the handrails in white, and the work on the body shell will be complete (except for the addition of the air horns on the pad above the conductors side front window). I still need to build an end to the fuel tank, but now I have the proper paint color the hard part of the cosmetic restoration is behind me.

For my next project I am going to revisit the wiring. I am not happy with the way the wires are attached to the trucks, I am afraid the wires will break off if left as they are now, so I am going to see if I can find a better way to attach them. I am also going to measure and check to see if a sugar cube speaker would fit in place of one of the lead weights without fouling the driveshafts, and if so how much weight will be lost. After that the decision will be made to fit a sound decoder or a regular decoder.

But that is a tale for another time.

Wednesday, August 17, 2022

Cotton Brute Restoration 4

 By far the most difficult part of this restoration is matching the paint.

This week I have been a bit busy on other things (really, all this working for a living is interfering with my train time. It must stop, I say) so I haven't been able to get a great deal done. I did have the goal, however, of getting rid of the humpback appearance in the shell.

To that end I ordered a Sand-It from Micro Mark (one of the beneficial side effects of doing this project is I can justify getting tools to The Management) and when it came in I carefully disassembled the body at the splice points, built a jig to hold the parts square, and squared the ends up.

The results were satisfactory, except for one simple thing...the body, once reassembled, was too short to fit the frame. I had expected this, so the next step was to build some shims. I decided to put one shim in at each body join to prevent a large and overly-noticeable splice point at one spot, and also to restore a bit of detail in the roof vents.

The first step was to glue the rear body half to a thin piece of .010" styrene. I used a piece of the weight to keep the sides straight and at the proper width all the way down, and when the glue had completely dried I carved the sheet out to the profile of the inside of the shell.

The two halves were then glued together, once more using the weight piece to keep everything nice and aligned, and then I repeated the process for the end of the shell.


The end cap was then glued on, the splices shaped with various filing, cutting and sanding tools, and the whole thing test fitted onto the frame. It fit perfectly once more, and best of all, no more whale imitations.


Now comes the tedious process of paint matching. The Tamiya XF-24 Dark Gray is a very close match, but it is not quite there. It is too blue, and much to my surprise the original paint is slightly green.

I have tried mixing various paints I have on hand, but even though I get oh so close it still isn't right. I have been tempted to see if I can match the decal font and paint the whole thing, but I am going to try to find some olive drab green and make another attempt at paint matching.

I did discover by happy accident (I had to touch up a Burlington freight car and had it sitting beside the Brute to dry) that the red is Badger CB&Q Chinese Red, although the old paint is a bit weathered. Fortunately the red doesn't need any work, but if it does a quick shot of Dullcote over it will tone the new paint down to match the old (verified on the boxcar).

As a final note, I said in my last post that I should take some pictures of the conductors steps, and so I have.


Building the steps out of styrene worked better than I expected, actually. I think they turned out pretty well.

Thursday, August 11, 2022

Cotton Brute Restoration 3

 More work done today on the Brute.

The first thing I did today was rebuild the front pilot. The snowplow was up too high and was in the way of the handrail bottom mount, so I moved it down. In the meantime I found a dummy coupler to put on it. I never did like the looks of the front without a coupler, I thought the loco looked funny without one. It has one now, it is non-functional but I think it looks better.


The next thing I did was cut reliefs in the front and rear weights with the intention of installing some lights. When the loco was built it had none, but there were no surface mount LEDs at that time. Now that there are it is not too complicated to install lights in tight places.


After that I had to make a run to Nicks Trains for some supplies. I was looking for a suitable match for the paint and since the Gold Medal Model handrail stanchions had arrived I needed some brass wire to make handrails. Nicks is about the only local hobby shop left that deals in trains (exclusively so), and so I support his business any time I can.

With supplies in hand, I turned my attention to building some handrails. First the Gold Medal Models handrail stanchions were glued in place, then the brass tubing was bent to form the rails. I had one piece of the original rail left, so I was able to use that as a guide.


The body was then set aside to let the glue dry and I started in on the lights. I decided to rewire everything while I was at it, including the trucks that I had been putting off, with the proper color coded wiring for future decoder installations.

This was actually my first time working with surface mount LEDs, so I took my time and tested after the wiring to the lights was complete before installing them in their pockets.


Once the lights were installed and the wiring redone, I put the loco on the track and tested everything. All worked as it should, so I went back to the now dry shell and finished the paint and front coupler installation.

As an added bonus, the front coupler is only slightly higher than the Micro Trains coupler height gauge. I've tested it, and even though it's a dummy it is possible to connect a car to it. There is no swing to the coupler so it will probably pull anything it is coupled to off the tracks in a curve, but there it is.

I'm pretty happy with the way the handrails turned out, and the lights really add the missing element.

At this point about the only thing left to do is the front of the fuel tank and the air tank that goes between the fuel tank and front truck. I plan to scratch build it out of styrene as well, but that will wait until another day.

And with that my vacation is over. I have to go back to work tomorrow so the Brute will have to wait for a while for its fuel and air tank.


Tuesday, August 9, 2022

Cotton Brute Restoration Part 2

The restoration continues.

I took no photos of the truck removal, disassembly and cleaning but it has been done. The hard-wiring has not been completed, but the coupler has been installed on the rear truck. Micro-Trains has a coupler conversion for the Mini-Trix U30CG locomotive that served as the donor for the original build, so this was not a difficult operation. The front coupler has not been installed since that would take a complete rebuild, and possible removal, of the snowplow, and since the original build did not have one this was not a difficult decision to make. Perhaps a front coupler will be installed at a later date, but for now the rear coupler is all that it needs.

With the trucks and couplers done (but not hard wired, that is a project for another day) I turned my attention to the shell. Over the years the conductors side front step had been broken off, so something had to be done about that.

The first thing I did was file the broken area even with the bottom of the remaining step so that I would have a flat surface to build from. This made a notch from the bottom of the step to the body of the locomotive which required some fitting of the replacement piece.

A notch was cut in the piece of styrene that I was going to use for the replacement rear step support and it was carefully sanded and fitted to the broken surface. I didn't concern myself overly much with getting the width right because that would be taken care of later on.

The new step support was then glued into place and cut to the proper length.

The new bottom step was cut from a thinner piece of styrene and modeled after the engineers side bottom step. Once again I wasn't overly concerned with getting it exactly right since I was going to shape it once it was in place.

With the new pieces roughed in and glued in place, the hardest part of model railroading then began. I refer, of course, to the time it takes for the glue to dry.

Once the glue had dried sanding sticks were used to shape the replacement pieces. The rear step support is tapered from the top to the bottom, so it had to first be sanded flush with the locomotive body side and then the rear was sanded to the correct profile.

The inside of the bottom step and rear step support also had to be shaped with sanding sticks to ensure a proper fit to the chassis. I wasn't overly concerned with getting the inside shape exactly right because no one is going to see it once the shell is installed, but the outside was carefully shaped.

Two steps had to be cut and fit, then glued into place. I was careful to get the outsides right, but the insides are a little long. They will be trimmed off  and the final shaping done when the glue dries.

And now, once again, we wait.

I have ordered a set of Gold Medal Models handrail stanchions, and once they arrive new handrails will be formed from brass wire and installed. After this is done the gray paint will be carefully matched, then the new steps, handrails, and the edge of the snowplow that is showing bare metal can be painted.

But that is a tale for another day.

Saturday, July 30, 2022

A Piece of History

 Jim Fitzgerald, the founder of N-TRAK, built three locomotives in the late 70's; Cotton Brute, Cotton Boss and Cotton Beast. Cotton Brute was built from two Minitrix U30CG locomotive shells glued together, and the frame was built from several chunks of lead weight atop a single machined piece of depleted uranium. The finished locomotive weighed in at a pound and a half (remember this is an N scale locomotive) and set a record by pulling over 500 Micro Trains hopper cars.

In other words, it was well named.

After Jim Fitzgerald's death the locomotive was stored and not operated, and during its long storage it started to separate back into its component pieces. The locomotives were recently transferred to the present NRAIL (successor organization to N-TRAK) President, John Wallis, who also happens to be president of my local model railroad club.

With the locomotives in hand he decided it would be a wondrous thing to restore Cotton Brute to operating condition for the NRail 50th anniversary next year, and he put out the request for volunteers to do the work on them.

I tell you that so I can tell you this:

Yes, I now have temporary possession of a piece of N scale history for the purpose of restoring the locomotive to operating condition.

What's more, I have actually accomplished this feat, although the work is not at all completed. The motor on the locomotive did not run for reasons unknown, it was thought to be a bad motor and so a replacement, with a cryptic message on it, was included.

Fortunately the replacement was not needed, because when the lead weights were removed it was discovered that a wire had come loose. It had been soldered to the head of a brass screw, and over the years that solder joint had separated from the screw head.

This is a good thing IMO, since Cotton Boss is also in John's possession. It makes me wonder why the motor is in this box. But I digress.

Rather than attempt to solder the wire back to the screw I opted to make a tab out of brass and solder the wire to that. I also shortened the wires so they would fit better under the shell. Once finished the locomotive actually ran, poorly. A bit of oil on the drive line bearings and a bit of wheel gauge adjustment had it running quietly and smoothly again.

Once the chassis was running I then turned my attention to the shell. It was in three pieces, which were relatively easy to glue back together, and the front pilot with snowplow had come off as well. It, too, turned out to be relatively easy to put back on.

The locomotive still needs a good cleaning and lubrication, there are some wiring issues to address, it needs handrails fore and aft, and there is a front step missing on the conductors side. Future work will include hard-wiring the trucks to eliminate slide contacts, which will be done during the cleaning and lubrication, the addition of at least a rear Micro-Trains coupler (putting a front coupler on is possible, but will require the removal of the snowplow) and the completion of cosmetic work to include cleaning up the glue joints to try to make them a little less obvious.

After all this is done John plans to send the locomotive out to possibly have a sound decoder installed. That will require some milling of the frame, so a shop that specializes in that kind of work will be contracted to do it.

But for now, at least, I have a piece of history roaming the rails of my humble little layout.