The heavyweight cars that I had in the paint shop to be put into N&W livery are done, and they are beautiful. I am still waiting on four coaches, but I have a string of 6 that I could run...if they had the proper couplers. I have a set of MicroTrains trucks and couplers on their way, but in the meantime I have installed a dummy coupler on one end of the baggage car.
The smoothside cars that I had in the paint shop to be put into N&W livery are done as well, and yesterday while I was mucking about putting the decoder into the SD7 I had them behind N&W 601 doing laps.
I am told that the Pacific that was formerly in Lackawanna paint is almost done (I was putting it into N&W paint), and the streamlined Hudson shell is almost done with its fantasy Erie paint job as well. So soon I should have my four N&W coaches, my fantasy N&W streamlined Pacific and my Erie streamlined Hudson all set up.
Next step will be to put a chip in that Hudson, which may be a lot of fun, and then I'll be able to run the Erie consist. I'd like to take it to the next show in December but I'll have to see how it goes. I definitely will take N&W 601 and associated cars. I'd take 611 as well...but everyone has 611.
I must say that I am now convinced that DCC is the way to go. I still have my DC/DCC control panel set up on the home layout, but about the only time I use it any more is to isolate the front siding so I can use it as a programming track. I still have enough DC only locos to keep it, but they are getting to be a smaller and smaller percentage of my roster.
One day I might even get crazy enough to chip my Nn3...
Showing posts with label Passenger cars. Show all posts
Friday, November 10, 2017
Tuesday, April 4, 2017
Erie Varnish
As promised, here are the pics of the Erie passenger cars that just came back from paint:
Baggage and combine
Two coaches
Sleeper and diner, the sleeper is in factory paint and was the inspiration for the repaints
Heavyweight observation car, also in factory paint.
Unfortunately as soon as I got them assembled and put on the track I realized that they were not going to work with my locomotive, because it is in the wrong paint scheme.
I had some cars left over, so I thought I'd try my hand at repainting some myself in (as far as I know) a completely fantasy paint scheme:
Blue and gold coach
Blue and gold observation
Blue and gold assembled
The pictures didn't come out so well but the cars did OK. I have to find some thinner stripes for the top to better match the locomotive.
I particularly liked the eagle on the observation car:
I'm going to have to do some trimming to make it look better, but I didn't think they turned out so bad for a quickie decal job.
At any rate, the green and cream cars were fantastic, I can't wait to see what the Norfolk and Western cars will look like.
Baggage and combine
Two coaches
Sleeper and diner, the sleeper is in factory paint and was the inspiration for the repaints
Heavyweight observation car, also in factory paint.
Unfortunately as soon as I got them assembled and put on the track I realized that they were not going to work with my locomotive, because it is in the wrong paint scheme.
I had some cars left over, so I thought I'd try my hand at repainting some myself in (as far as I know) a completely fantasy paint scheme:
Blue and gold coach
Blue and gold observation
Blue and gold assembled
The pictures didn't come out so well but the cars did OK. I have to find some thinner stripes for the top to better match the locomotive.
I particularly liked the eagle on the observation car:
I'm going to have to do some trimming to make it look better, but I didn't think they turned out so bad for a quickie decal job.
At any rate, the green and cream cars were fantastic, I can't wait to see what the Norfolk and Western cars will look like.
Monday, March 27, 2017
Developments
When last we spoke of J class locomotives and DCC I had failed in my attempts to chip N&W 601, a locomotive that you may recall I had purchased in a non-running condition with wiring issues. As you may also recall I attempted to repair those wiring issues with a complete point to point rewire (using the color coded wiring from a used decoder), which I now actually believe was successful but did not work out the way I had planned.
I did order the Bachmann wiring harness, and it came in last month. I took the locomotive, the new harness, and the decoder that had been installed, uninstalled, reinstalled and once again uninstalled with me to a friends house yesterday. He has a Digitrax system connected to a laptop with JMRI software installed, which I hoped would be useful in diagnosing the problems with the install.
Using his work bench (since mine is currently in the living room until its new home can be prepared) the new wiring harness was prepared and installed. Once installed and tested the decoder installation was started once more on the PCB in the tender.
Right away I ran into the issue of finding one of the pads burned off of the PCB. Not to worry, there was still plenty of copper left on the underside of the board, which was actually better because the trace was connected on the underside anyway. To access this I pulled the board off the tender...and discovered the copper contacting strips, which were supposed to be contacting the trucks...weren't.
Not to worry once more, I tinned the truck contacts and prepped them to have the PCB wiring connected to them directly in the same manner that the PRR K4 wiring is done (which I believe to be a better arrangement even though it makes the trucks, for all intents and purposes, non-removable; in itself once again not an issue since I don't plan on having to remove the trucks for any reason, and if they do have to be removed they can be desoldered). I then installed the decoder, connected the trucks, connected the loco harness and reassembled the tender.
When the loco was placed on the programming track the Digitrax/JMRI computer was able to find the decoder right away and determine its programming parameters. The small hand held controller I had used in troubleshooting had programmed the loco with number 531, not 601, and even though I attempted to change that address with the MRC controller it obviously was not effective (which explains why the loco would not work with the MRC but would with the small handheld). Once that was fixed the loco was put on the layout...and it runs beautifully.
I ran a couple of laps on his layout but since he uses Atlas C55 track and apparently all of my cars have pizza cutter wheels I was not able to run it with a consist. It does however start and stop smoothly, it responds well to the throttle and the lights work as they are supposed to. He was amazed that such performance could be had from a Bachmann (he is one of those who judge the B-mann by their hideously inferior white box models and not by their vastly improved Spectrum line).
Since my own layout is in disarray at the moment I am unable to run it with my MRC system, but I have no reason to believe it won't perform just as well at home as it did away. And now I have two N&W J class locomotives to play with (and I can double-head them if I want to!), with a slew of cars in the paint shop to split between them.
And speaking of cars in the paint shop, the Erie cars came back yesterday as well, and they are beautiful. I need to get trucks and couplers for them, and a handful of weights as well, and then they will be ready to go on the layout. Pictures, as promised, when available. I might, however, need to get a set of the ConCor PA1/PB1 locomotives in the matching Erie paint to go with them now since the PA1 I have right now is in the blue and yellow livery instead of the green and cream (and I don't have a B unit for it).
The only sad part of the day was discovering that one of my B-mann GP7's is once again acting up, same issue as before with the dimming lights and slowing to a stop. This time the tab bending trick didn't work, so it may be time to replace that decoder board.
And that's the news from the Path Valley Railroad.
I did order the Bachmann wiring harness, and it came in last month. I took the locomotive, the new harness, and the decoder that had been installed, uninstalled, reinstalled and once again uninstalled with me to a friends house yesterday. He has a Digitrax system connected to a laptop with JMRI software installed, which I hoped would be useful in diagnosing the problems with the install.
Using his work bench (since mine is currently in the living room until its new home can be prepared) the new wiring harness was prepared and installed. Once installed and tested the decoder installation was started once more on the PCB in the tender.
Right away I ran into the issue of finding one of the pads burned off of the PCB. Not to worry, there was still plenty of copper left on the underside of the board, which was actually better because the trace was connected on the underside anyway. To access this I pulled the board off the tender...and discovered the copper contacting strips, which were supposed to be contacting the trucks...weren't.
Not to worry once more, I tinned the truck contacts and prepped them to have the PCB wiring connected to them directly in the same manner that the PRR K4 wiring is done (which I believe to be a better arrangement even though it makes the trucks, for all intents and purposes, non-removable; in itself once again not an issue since I don't plan on having to remove the trucks for any reason, and if they do have to be removed they can be desoldered). I then installed the decoder, connected the trucks, connected the loco harness and reassembled the tender.
When the loco was placed on the programming track the Digitrax/JMRI computer was able to find the decoder right away and determine its programming parameters. The small hand held controller I had used in troubleshooting had programmed the loco with number 531, not 601, and even though I attempted to change that address with the MRC controller it obviously was not effective (which explains why the loco would not work with the MRC but would with the small handheld). Once that was fixed the loco was put on the layout...and it runs beautifully.
I ran a couple of laps on his layout but since he uses Atlas C55 track and apparently all of my cars have pizza cutter wheels I was not able to run it with a consist. It does however start and stop smoothly, it responds well to the throttle and the lights work as they are supposed to. He was amazed that such performance could be had from a Bachmann (he is one of those who judge the B-mann by their hideously inferior white box models and not by their vastly improved Spectrum line).
Since my own layout is in disarray at the moment I am unable to run it with my MRC system, but I have no reason to believe it won't perform just as well at home as it did away. And now I have two N&W J class locomotives to play with (and I can double-head them if I want to!), with a slew of cars in the paint shop to split between them.
And speaking of cars in the paint shop, the Erie cars came back yesterday as well, and they are beautiful. I need to get trucks and couplers for them, and a handful of weights as well, and then they will be ready to go on the layout. Pictures, as promised, when available. I might, however, need to get a set of the ConCor PA1/PB1 locomotives in the matching Erie paint to go with them now since the PA1 I have right now is in the blue and yellow livery instead of the green and cream (and I don't have a B unit for it).
The only sad part of the day was discovering that one of my B-mann GP7's is once again acting up, same issue as before with the dimming lights and slowing to a stop. This time the tab bending trick didn't work, so it may be time to replace that decoder board.
And that's the news from the Path Valley Railroad.
Wednesday, July 31, 2013
Sunday, May 27, 2012
Passenger cars
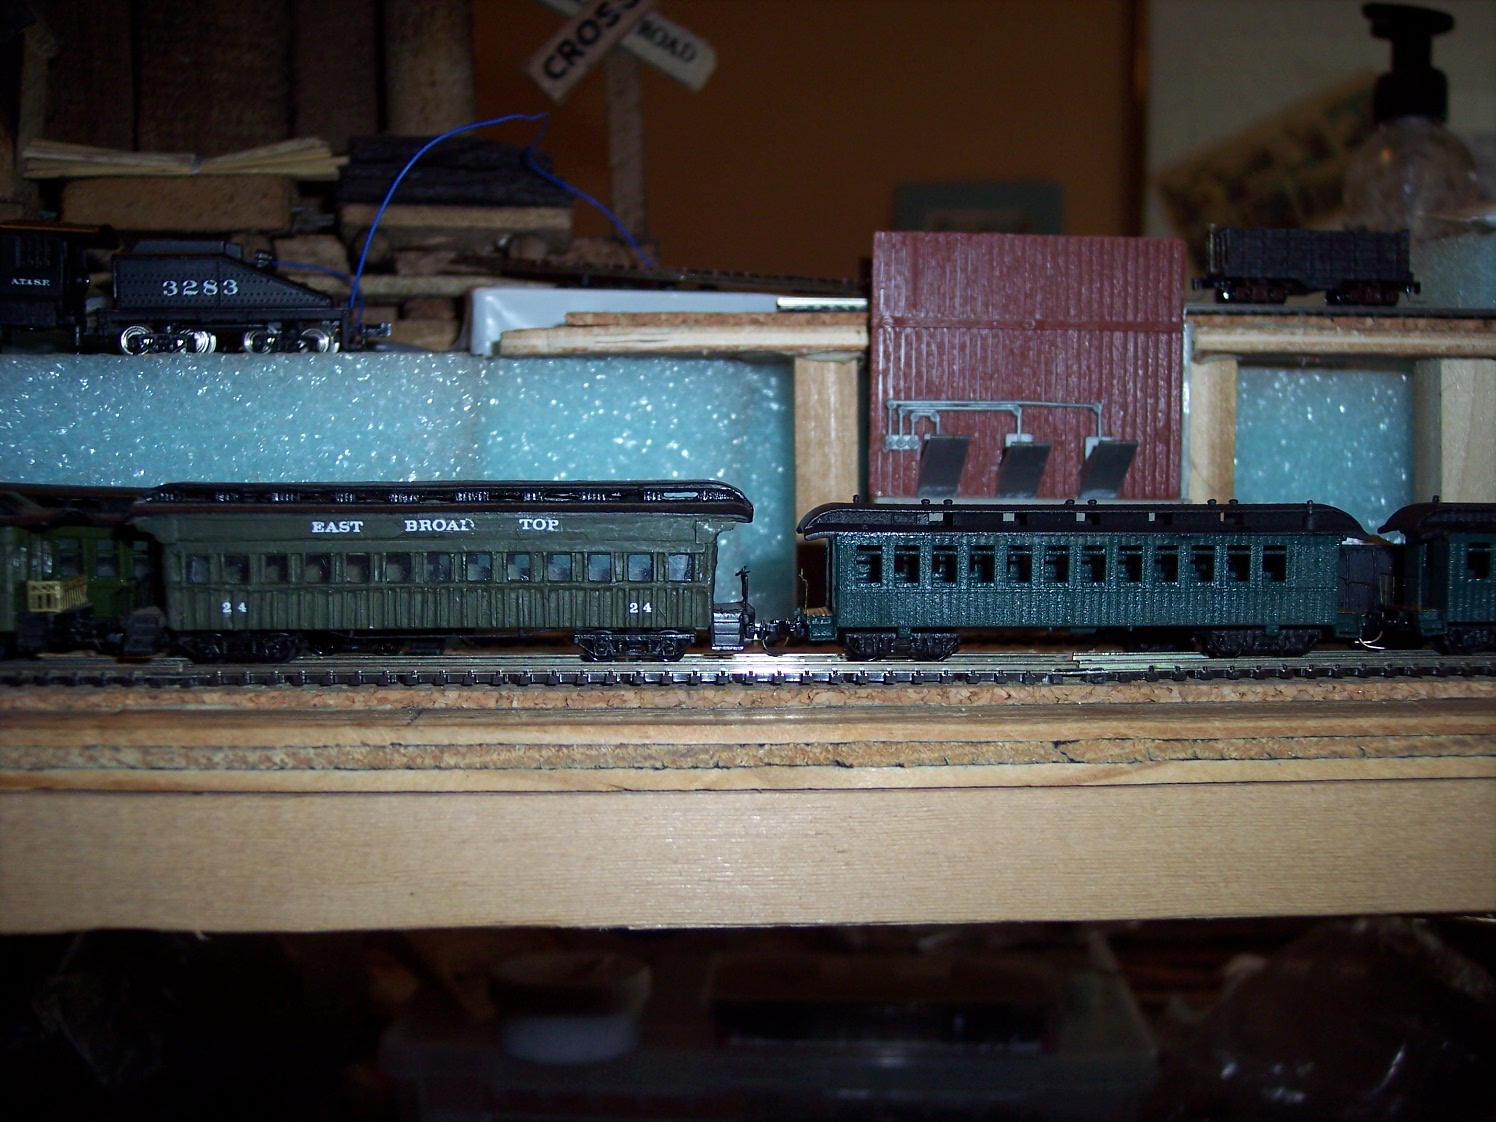
Three of the four Shapeways passenger cars; two coaches and a baggage car. The combine was, unfortunately, destroyed by my rough handling. These cars are fragile!
They are smaller than the converted Bachmann cars I have, they aren't as tall and have no letterboard. Part of this is due, I think, to the RLW roof I have on Coach 24. I should have trimmed off some of the Bachmann's letterboard, in comparison to the Shapeways car it looks encephalitic.
Parlor car 20 has the original Bachmann roof so it isn't as bad, but it is still taller than the Shapeways cars. The picture is a bit blurry because the camera chose to focus on the background (one day I'll have to learn to use the settings instead of the automatic functions), but it shows the difference in car heights. (Yes, I know, I need to put battens on the parlor car under the window trim. Yes, I know, the center window isn't actually on center on one side of the prototype. It's an N scale model, give me a break.)
One thing I should have done and didn't is put "glass" in the Shapeways cars. I didn't think it would make a big difference, but it definitely does. Clear plastic from the coupler packages would have filled the bill quite nicely. I will do this in the future, but the roofs are glued on these cars and they would be destroyed if I tried to remove them, so they are going to stay the way they are.
In conclusion, the Shapeways cars are a quick and easy (and inexpensive) way to expand your varnish fleet, they are easy to assemble and the results are good. Just be careful with them and they should do fine.
They are smaller than the converted Bachmann cars I have, they aren't as tall and have no letterboard. Part of this is due, I think, to the RLW roof I have on Coach 24. I should have trimmed off some of the Bachmann's letterboard, in comparison to the Shapeways car it looks encephalitic.
Parlor car 20 has the original Bachmann roof so it isn't as bad, but it is still taller than the Shapeways cars. The picture is a bit blurry because the camera chose to focus on the background (one day I'll have to learn to use the settings instead of the automatic functions), but it shows the difference in car heights. (Yes, I know, I need to put battens on the parlor car under the window trim. Yes, I know, the center window isn't actually on center on one side of the prototype. It's an N scale model, give me a break.)
One thing I should have done and didn't is put "glass" in the Shapeways cars. I didn't think it would make a big difference, but it definitely does. Clear plastic from the coupler packages would have filled the bill quite nicely. I will do this in the future, but the roofs are glued on these cars and they would be destroyed if I tried to remove them, so they are going to stay the way they are.
In conclusion, the Shapeways cars are a quick and easy (and inexpensive) way to expand your varnish fleet, they are easy to assemble and the results are good. Just be careful with them and they should do fine.
Subscribe to:
Posts (Atom)