Friday, October 28, 2016

Projects

I get these plastic boxes from work, they contain consumable parts and when they are empty they become trash. They are useful for a number of things, and in fact they are sold for scrapbooks at craft supply stores like Micheals.

They stack on top of each other, but since I have so many of them it is sometimes a royal pain to get to things that are on the bottom. So today instead of going to the dentist I made this:


The boxes are now easy to get to, no matter which one you are looking for. It works very well, and in fact I have been commanded by She Who Must Be Obeyed to make a couple more of them; on for SWMBO and one for Mother In Law.

I did reschedule the dentist visit.

Tuesday, October 18, 2016

Here Comes Another One

I acquired another Minitrix K4, this one in Santa Fe livery instead of PRR.

The only difference between this one and the two previous ones is this one only has a single wire connection to the locomotive (even though the second wire's hole is present on the back of the locomotive cab) with the front truck conduction being handled by way of a stiff wire to the locomotives trailing truck. Either way it suffers from the same pickup woes as its sisters, and when I attempted to remove the tender shell I found it had been glued to the tender frame.

Fortunately for me these locomotives have long been kitbashing fodder, so there are more than a few orphaned tenders out there, and without a great deal of effort I managed to get one. I shaved off the extra detail on the pilot as I had done with my previous locomotive and installed the replacement tender, which was painted in the Pennsylvania Railroad livery, and with a quick bit of IPA the lettering came off the cab, so I now have three PRR K4 locomotives.

I think I will spend some time on this one to see how good I can make it look.

That's Better

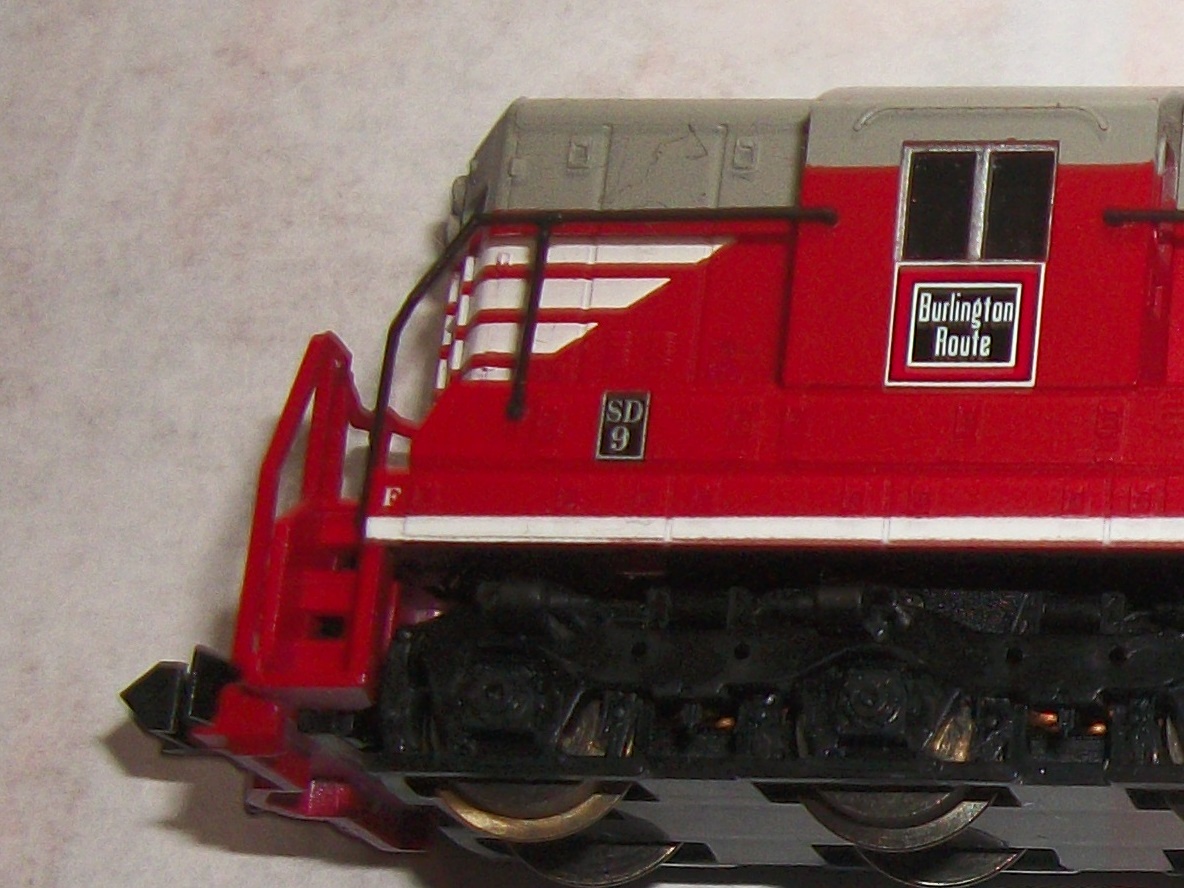
Ever since I did the truck modification on my SD7/9 (whatever it really is see picture below) and attempted the first DCC decoder installation I have been disappointed with the pulling power of the locomotive. Before I started messing with it the darn thing would pull like a plow team, but since then it has been slipping and losing traction all over the place.

I thought maybe the wheels were dirty, so I picked it up, flipped it over and started checking the wheels...only to find out all three sets of wheels on the rear truck were freewheeling. D'oh! It seems that during the reassembly I let the idler gear that transmits the power from the worm gear (the worm is the one on the motor, the worm gear is the one that the worm engages) to the wheel gears slip to the wrong side, so it not only was not engaging the worm gear, but it also was not engaging the wheel gears.

Since the truck modification more or less permanently installs the trucks to the frame I had to remove the worm from the tower and fish the worm gear out through the top. I was then able to slide the idler over into the right place, reinstall the worm gear and the worm, and voila! the damn thing pulls like a plow team again.

This is a good thing since I decided that I didn't have a team track at my freight station and really needed one. This of course means I have to have a flatcar or two and maybe a few more boxcars and such so that various deliveries can be made to the team track. More cars means the engine has to be able to handle more load, which it certainly couldn't do as a Front Truck Drive only locomotive.

After initially working well, however, the turnout I put on the team track has decided it really doesn't want to conduct power to the diverging route any more. I should have put a feeder on the team track anyway, so it looks like the easiest corrective action will be to do just that. I also have a rail joiner or two that isn't conducting, so either I need to put in more feeders or I need to solder some joiners.

Either way, it looks like I have a future engagement with my soldering iron.

UPDATE: Well, it looks like that question is solved at least. And, since there is an F on the short hood side it looks like the Burlington ran their locos short hood forward, which means I have it wired backwards. Of course.

Sunday, October 2, 2016

Success!!!

My last DZ126 Digitrax DCC decoder has been installed into the SD7 SD9 (explanation below).

There were a few things that were kinda screwy, and it's probably all my fault anyway but I did get everything straightened out.

First off, when wiring in a decoder the red wire goes to the right side pickups of the locomotive and the black wire goes to the left. The motor brush that once was connected to the right gets the orange wire and the other motor brush gets the gray wire.. The blue wire goes to both headlights, the yellow wire goes to the back light and the white wire goes to the front light.

Before the mod the bottom brush on the locomotive was connected to the right contacts and the top brush was connected to the left contacts. I wired up the decoder as specified with the orange wire to the bottom motor contact and the gray to the top motor contact, and then I put it on the track.

Operating in DC mode the lights did not come on at all, which I thought was kind of screwy but OK. Then I connected the DCC controller and programmed the loco...and the wrong headlight came on. The motor however ran just fine, just like it was supposed to, so no big deal. Back to the soldering bench, reverse the yellow and white wires and now the headlight on the leading end of the locomotive comes on when it is supposed to.

However, there was another problem, and the headlights should have clued me in. You see, when I actually paid attention to the NCE controller display I found the locomotive was running backwards.

How this happened I have no idea, but the instructions were clear so I should have known; the instructions clearly state to connect the gray wire to the bottom motor tab and the orange wire to the top (the link goes to a TCS decoder installation page but the wire colors are identical). Why the locomotive ran properly in DC is anyone's guess, perhaps I was incorrect in thinking the red side contacts were the positive leads.

At any rate the issue is easily solved, back to the programming track and change the locomotive direction bit (CV29 bit zero) and all is well. This bit is supposed to be used to reverse the direction of the loco in consists or when you want to run it backwards; IE if it is designed to run long hood forward like the SD9.

In my case I wanted the loco to run short hood forward; if I had wired the motor correctly it would have and I would not have had to swap the lights. The direction bit isn't supposed to be used to correct motor wiring, but since I had already switched the headlight wiring it worked out.

Or maybe, since the only difference between the SD7 and the SD9 was the prime mover (the diesel motor), and since (according to the Wikipedia article) Burlington locomotive 346 is actually an SD9, I had it wired correctly all along...except for the original headlight wiring, which was incorrect because I mistakenly thought the short hood was the front.

UPDATE: Or not...the F on the short hood end indicates the front, which means I did have the motor wired backwards to begin with...and now the headlights too. Of course. And, the locomotive is clearly marked as an SD9. And also of course, the answer was right there all along.

Anyway, it now has a decoder, the decoder works, it programmed correctly, and I have it running in the direction I want it to run. Also, with the previously DCC'd K4, the entire railroad is now DCC when running the usual locomotives, and I now have seven locomotives I can run on the club tracks (well, six actually since the first loco I successfully converted, a Model Power Pacific, is in for repaint).

And now I am all out of decoders, at least until the broken one returns from Digitrax. I haven't yet decided what my next victim will be...

Friday, September 30, 2016

DCC'ing

I have four Digitrax decoders.

I put one into a Minitrix K4. It doesn't work. I open it up and find the black wire has somehow gotten cut and is touching the gray wire. D'oh!!!

I have three Digitrax decoders.

I install one in a Minitrix K4. It doesn't work. I open it up and can find nothing wrong. I remove it and the locomotive still doesn't work. I clean the motor brushes and now it works. I give up on this Minitrix K4.

I may have three Digitrax decoders.

I install the suspect one into a Bachmann Spectrum N&W J class. It works. I am happy.

I have two Digitrax decoders and a locomotive with DCC.

I install one into a different Minitrix K4. It works. I am happy. I also now have four Pennsylvania Railroad locomotives with DCC; two Bachmann GP7's with factory decoders, one Model Power Mikado that I got the bugs worked out of last weekend, and the K4.


Friday, September 23, 2016

T-TRAK: The Adventure Begins

I don't remember if I mentioned that I have recently joined the North Raleigh Model Railroad Club. Just this past weekend I attended the Great Train Show at the Raleigh fairgrounds with the club and had an opportunity to debug and run the Model Power Mikado that I had put the DCC decoder in.

Apparently somewhere along the line I had reversed a wheelset, but since the Model Power inexplicably uses axle wipers for pickup power instead of the 4 wheel pickups that are found in the Bachmann Spectrums and Kato Mikados the connectivity was so horrendous that I didn't notice it. This made the loco stall in various spots around the layout and when I cleaned the wheelsets and axle wipers it caused a dead short on the track.

Some quick investigation with a multimeter and the offending wheelset was found and reversed, and the Mikado happily pulled a coal drag around the mountain track all day Saturday. I was hoping to get a decoder put into one of the K4 Pacifics but alas it was not to be, I don't know what is going on with that loco but it is pretty annoying...kind of like the SD7.

At any rate, running on the club layout really gives the locos a chance to stretch out and show their stuff, something they really can't do on the cramped setup I have at home. Unfortunately I really don't have the room here to build N-TRAK modules, but thankfully there is an alternative...T-TRAK!

My plans are to build some T-TRAK modules for show and also maybe for use at home since they are small enough to sit on a table when they are in use and don't take up much storage space when they are not. But of course, me being the glutton for punishment I am, I insist on putting Nn3 on my modules, which as far as I can tell has not been done before.

My intentions are to use Rokuhan Z scale roadbed track 220mm curves at 38mm (1.5 inches) elevation. This puts my Nn3 trackage a little over an inch and a half from the standard gauge and high enough that I can run a spur of standard gauge underneath the narrow gauge if I want to, as long as I don't use tall cars on the spur.

Rokuhan does not have sectional track in the proper lengths to make multiples of 310mm, but fortunately they do have flextrack. This comes in 330mm lengths, so a single piece of flextrack will suffice for each module. I'm planning on soldering the feeders to the track so connections shouldn't be an issue either.

I'm not a big fan of the toylike looks of the Rokuhan turnouts but I'm not planning on having any on these first six modules anyway, and when I do there is always FastTracks. I have several of those to use so I won't have to build any more right away, either. I'm also not a fan of their method of putting power to the track, so I'll be soldering feeders to the rail joiners on the corner modules.

So far I have all the track I need, both the Kato Unitrack and Rokuhan, and I have just ordered all the connectors that will be required. Next is to get the lumber and foam and start building.

Maybe I'll even be able to get this project done.

Sunday, September 11, 2016

Sigh

I tried to put a decoder in a K4 last night.

I failed miserably.

One of these days I'll be able to do this without all this bother...I hope.